Smoke & Spectre!
Battle-System
Smoke & Spectre!
The successor to Dynamic Fog of War, with Smoke & Spectre you are able to have individual players only able to see their token's visible area, create light sources, import UVTTs maps and even display tokens that only specific players can see.
Table of Contents
Smoke: Quick Start
So, your game starts in an hour and you've prepped nothing - but you want to distract them with some fog. Sure.
- Click the 'Glasses' icon in the toolbar, and select the Line tool. Draw to your heart's content.
- Add a token to the scene. On that token, through the context-menu, 'Enable Vision'.
- (Optional: Assign ownership of that token to a specific player, so they can only see through that token.)
- Click the checkbox in settings to turn on Fog Fill.
- Done!
Spectre: Quick Start
You need to drive someone crazy in a hurry, I get it. Just make sure the player is in the game first for this to work.
- On the token in the scene, that you want to be visible to ONLY certain players - open the context-menu and select "Spectre". This will make the token visible to YOU, and no one else.
- In the 'Spectre' window of the extension, you will now see that token. In the drop-down, select the player(s) you want to be able to see that token.
- Done! Only those specific players (And yourself) can see that token.
Smoke & Spectre UI Overview
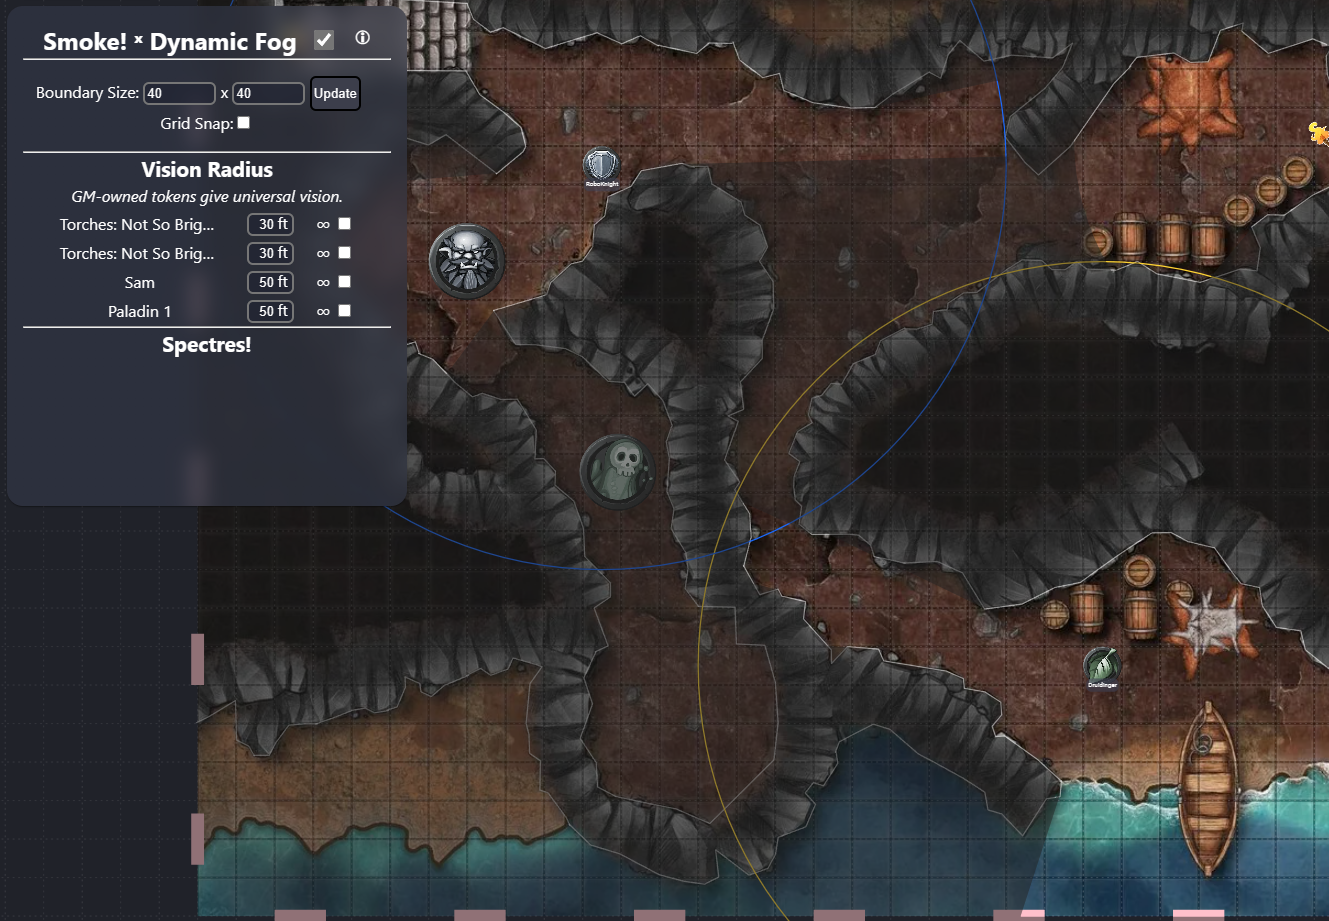
1. Smoke Panel
This panel holds information on all tokens that have Vision Enabled. This includes Light sources as well as Character Tokens. A token only gets to this list if you click 'Enable Vision' on it.
 There are two sets of options to configure a token's vision range;
For Basic Settings:
There are two sets of options to configure a token's vision range;
For Basic Settings:
- Range: Set the desired radius for a token's vision range.
- Falloff: Change the edge of a tokens' vision range from a hard line to a soft blur (Try values 0 - 5).
- Disable: Disable a single token's vision - useful for a quick 'Blind' status.
- Move to Out-of-Sight List: Moves this token to the lower list which can be hidden from view. Useful if you have lots of items in the scene but the majority of them will never be changed/updated For Advanced Settings:
- Collision: Set how far away from the token's center collision will occur when using unpassable walls. If the collision range is set too high, it could prove difficult to move a token in a narrow hallway.
- Inner/Outer Angle: When looking to use coned vision, set these to the angle in which you would like to constrain vision. The direction doesn't matter as much, as you can rotate the token and the cone will follow it.
- Greyscale: Enable to remove color from a token's vision radius, useful for a 'Darkvision' effect. This will set the entire vision radius to greyscale.
Also, if you right-click a token's name you can assign an owner for a token quickly and easily (Even if you do not have owner-only permissions turned on in your room)
2. Spectre Panel
This panel holds information on all tokens that have been 'Spectred'.
Note: When a token has been 'Spectred', it has been removed from the scene that items generally exist in. This can cause some issues with other extensions that might try to interact with the Spectred item, if they are not scoped to ignore these 'out-of-play' local items. In general, only do Spectre things with Spectred tokens.
 The options next to a token's name are;
- Set Viewer(s): Designate which other players are able to see this token.
- Delete: Remove the Spectre from play.
3. Settings Panel

The settings for smoke are generally saved to the Scene, as each scene might have different needs to make it work. The options are as follows;
-
Fog Fill: This will enable/disable the Fog Fill in the Owlbear Rodeo Fog settings. S&S3.0 requires fog fill in order to do dynamic fog processing (but does not require it for collision detection). This is a deviation from S&S2.0 where fog could be calculated in a small area via the bounding grid - which is no longer possible.
-
Disable Vision: This will disable vision for ALL tokens that have vision enabled. Useful if you need to blind the entire group, but do not wish to click each individual token.
-
Persistence/Reset: This will enable/disable Persistence on your map. Persistence will keep areas that a token has stopped as 'discovered', and it will not be covered in fog when the token moves away. The 'reset' button next to the toggle will reset the uncovered areas for everyone currently in the room.
-
Trailing Fog (Beta): Trailing fog puts an 'overlay' over the entire map that darkens it further. When an area is visited by a token with vision, this area is left 'revealed' but slightly darker than the area the token is currently in. This is to show that an area was explored, but no one is present. Trailing fog REQUIRES Persistence to be enabled to work. As for it's BETA status, it currently does not check collision data so will always show a full radius around the token.
-
Owner Highlight: This will enable/disable the colored rings that indicate a player's viewable range as a GM.
-
Autohide (Beta): Autohide adds a new context menu option for tokens (Enable Autohide). When this is toggled on for a token, that token will AUTOMATICALLY be changed to 'Hidden' when a token with vision is not in visible range of it. As for it's BETA status, it currently does not check collision data so will always show a full radius around the token.
-
Show Unit Menu: This enables the 'Unit Context Menu' where you can change a unit's vision parameters directly on the token. It will also show the 'Advanced' options for a unit, allowing you to change it's owner or assign it a dedicated elevation level to be at (a case for flying units).
-
Show Wall Menu: This enables the 'Wall Context Menu' where you can see the 'Advanced' options for a wall. This includes assigning it a SPECIFIC viewer to interact with and assigning a dedicated elevation level.
-
Wall Pass (GM): When enabled, allows a GM the ability to drag a token through walls - even if the walls have blocking enabled.
-
Grid Snap: This will enable/disable the custom grid snapping used for drawing Obstruction Lines/Objects in S&S (Note: You can hold CTRL while drawing to temporarily disable this.). This is independent of the default Snap setting in OBR.
-
Default Elevation: This will assign the default elevation for all areas where an Elevation Mapping does not exist.
-
Elevation Style: This will swap between the Mesa and City wall styles, which change how elevation layers above 0 interact.
-
Players-See-Doors: This will allow player's to see and interact with doors that have been created.
-
Double-Side Walls: This will change all walls on the map to be double-sided walls. This can be useful if an imported map lacked the information, and you do not wish to set each wall individually.
-
Block/Unblock Walls: By default, when you draw an obstruction it will be passable (with the exception of the Obstruction Brush tool). This will block/unblock all walls so that tokens ability to pass them is changed.
-
Lock/Unlock Lines: By default, when you draw an obstruction it will be auto-locked to make sure they are not moved on accident. Use these buttons to lock/unlock all lines so that they can be manipulated again.
-
Tool Options: This is for customizing the style of the lines that are created when drawing with the Obstruction Tools
-
Vision Defaults: This allows you to set the defaults for a token when their vision is enabled.
-
Import: Smoke is able to accept the UVTT format for building a scene for you. Select the map and Import, and the map image, obstructions, doors and light sources will be created in a new scene.
7. Drawing Tools
Added to the OBR Toolbar are Smoke's drawing tools.

- Obstruction Polygon: This tool is slightly different, in that it will create a closed shape - but the inside will be visible. This is useful for items like 'Large Boulders' on a map, where the player can see that it's a boulder, but they cannot see past it.
- Obstruction Line: This is your default tool for making an obstruction. Just click in your scene to create points for the line, and select Finish (or push Enter) when you're done.
- Obstruction Paintbrush: This tool creates obstructions by the grid. Click and drag to fill in the desired area, and when you let go walls will be created around the shape you have painted. This is useful for maps that are blocky and/or very square with angular hallways.
- This brush should reflect what the currently selected grid option is in Owlbear Rodeo, and supports Square, Hexagon and Isometric grids.
- Trim Tool: This tool will allow you to click two points on a line, and 'cut' it from the base line. Allowing you to easily lop off a section you didn't intend on, or add a door/window.
8. Drawing Conversions
If you prefer to use the base Owlbear Rodeo drawing tools, you can. All shapes and lines created via the default tools can be converted into an Obstruction. Just right-click the shape and select 'Convert to Obstruction'. This will remove the shape/line/drawing as it was, and recreate it as an Obstruction object.

9. Elevation Tools
Also on the Smoke Toolbar are the Elevation Mapping tools;
- Elevation Layers: Elevation Mapping Layers 1-5 let you draw a shape at that elevation level, and all points (from obstructions or tokens) when processed will be drawn with that depth in mind. A quick example (with Mesa style), if you draw an obstruction around a house on your map - and then draw around the house with Elevation 1 - you won't be able to see around/above the house when on the ground, but if you put the token on the house it will be able to see everywhere.
- Elevation Selection Tool: This let's you select your Elevation Layers.
- Elevation View Toggle: This toggles on/off the visibility of the Elevation Layers, as they should be hidden away when not being configured. (They still take effect when not seen.)
Smoke: Using the Obstruction Tools
When drawing obstructions, you have some options in the form of buttons...
- Finish: This will complete your line based on the points you added to the scene. You can also push "ENTER" on the keyboard instead of clicking the button.
- Cancel: This will remove all points and stop any line-drawing in process. You can also push "ESC" on the keyboard.
- Undo: This will remove the last point you have placed. You can also push "Z" on the keyboard. (Not CTRL+Z, just 'Z')
1. The Obstruction Line
The line tool is the basic building block for scenes, and likely will be the most used when creating a scene. By default, they block vision no matter what side of the line you are on. (The 'hidden' area is seen from the GM view in this screenshot, so it's only lightly obscured by darkness.)

Note: You are able to change how the default vision works for a line by going to the context-menu for a line and changing between Two-Sided, and One-sided.
You can also toggle an Obstruction Line's ability to block vision by clicking 'Disable/Enable Vision Line' in the context menu. In addition to that, you can also toggle a line into a 'Door'. Which works similar to the Vision toggle, but adds a door icon. More on this in the Doors section. You can change how an obstruction behaves in several ways:
- Enable/Disable Vision Line: This will toggle how this line interacts with a token's vision.
- Swap to One-Sided/Two-Sided: This will toggle how a token sees this line. A one-sided line will block vision from one side, but allow vision from the other. A two-sided line will block vision from both sides. A. (When on One-sided) Swap Obstructing Side: This will change what side of the line you are able to see through.
- Swap to Passable/Unpassable: This will change how this line behaves as a collider. A passable line will not stop a token's movement, but an unpassable one will.
- Enable Door: This will change the line to have 'Door' functionality. A line that has Door functionable has a few more buttons to improve flow.
- A. Disable Door: This will disable the line behaving as a door.
- B. Open/Close Door: This will change if a token can see through, and pass through this line.
- C. Lock Door: This will lock the door, so that players are unable to open it.
- Note: The 'Door' picture that appears can be double-clicked in order to open the door. It only serves the purposes of showing a door though. In order to manipulate the obstruction line that is the door - select the line.
- Enable Window: This will change the line to have 'Window' functionality. A Window line will be shown as a dashed line, and will also NOT block vision. It will block movement though.
- Note: If you want a window that can be opened, also Enable Door on the Windowed line.
2. The Obstruction Polygon
The polygon tool is more of a special case, it creates a closed shape where the INSIDE is visible from the outside. The area 'behind' that shape though, you are unable to see.
The use-case for this is generally with objects that are large (and the player would know what it is on sight), but they cannot see behind it.

It can also be useful when attached to a large 'Monster' token, as the players would be able to view the token - but not be able to view behind it. (In case it's so big that it blocks vision!)
Polygons also block vision if you are INSIDE of the shape. As in, you'll be able to see the area around you (within the shape) but not see outside of it. This could be useful if the shape is around a 'barrel' - and a player wants to hide inside. They will not be able to peer out of the barrel.
There is no hard-rule to how this thing is used, so it's really up to you to determine the best case. Feel free to experiment.
3. The Obstruction Brush
The brush tool is a quick-setup tool for maps that are blocky in nature, with lots of square rooms and hallways (Meaning, not a cave with lots of jagged its).
It's based on the grid, so be sure to line your map up accordingly first. After that, just click and drag as the brush highlights the squares it will draw obstruction lines around. The benefits of this tool is it will let you setup large maps rather quickly by just coloring them in.

Note: While this aids in setting up large areas quickly, you might find it useful to use the 'Trim' tool after to add a door.
Smoke: Using Tokens
1. Changing a token's vision range
In the Smoke Panel, once a token has had it's Vision Enabled, the token will appear on the list with some options. The default radius is 30, but you can change this to whatever suits your needs.

There are two sets of settings - Basic and Advanced. In order, the controls are:
- (Basic) Vision Range.
- (Basic) Vision Falloff.
- (Basic) Vision Disable.
- (Advanced) Collision Range.
- (Advanced) Inner Vision Angle.
- (Advanced) Outer Vision Angle.
- (Advanced) Greyscale Vision.
2. Who can see this token's view?
When a token is added to the scene, the OWNER of that token is the person who added it to the scene. Normally this is the GM. When vision is enabled on a token (and it's owner is the GM) every player is able to see the vision for this token. This is useful if you do not want everyone in your game to have their own personalized vision based on their token. If you do want people to only see from the viewpoint of their token, you want to make sure they are the owner of that token.
To speed up the flow of assigning ownership, you have two options:
- Let players drag in their own tokens. If they brought it in, they're the owner! Then just enable vision on it.
- Right-click a token's name in the Smoke Panel, and you are able to assign an owner to a token from a list of players who have entered the room at any point in time.

3. Linked Vision
To quickly assign vision groups, or simply have a token 'piggy-back' another token's vision settings - you can 'Link' a token to another one. From the Vision List, click and drag the name of a token on top of the token you want to link it to. This will 'nest' it, removing it's controls from view. From this point on, that token will use the parent token's vision settings.
To undo this, you click and drag the name onto itself - this will remove the link.

Smoke: Advanced Features
1. Using Torchlight (Previously Light Sources)
If you need ambient lighting on a map, you need to create a 'Torch'. This can only be token with token's on the PROP or ATTACHMENT layer. When you open the context menu of a token on either layer, you will see the 'Create Torchlight' option. Torchlights are added to the token vision list like all other tokens, but are appended with a 🔦 icon. All of the same settings can be used.

This is easiest to see with narrow hallways. If you add a torchlight to a small room, and then have a narrow hallway between it and a character token with vision, you will see that the vision the torch gives is constricted.
If you're looking to have your characters explore a dark area where they have to hold torches, it's a simple task. Create torch tokens, enable vision, set them as a torchlight and then attach them to the characters. Your other players will then be able to see each other when the light of the torch is not behind something obstructing it.

Given that torchlights are not needed to be manipulated often, it's often better to move them to the 'Out-of-Sight' list, to clean up the clutter in the Smoke panel.
2. Using Doors & Windows
In the context-menu for an Obstruction Line, there is an option for 'Enable Door' and 'Enable Window'.
Enabling a door will draw a 'Door' icon on top of that line, which can be toggled to turn on/off the obstruction properties for that line (thus opening the door, allowing people to see through).
Enabling a window will change the line to be 'dashed'. A windowed line is able to be seen through by players, but will still block movement (if blocking is enabled).

You can 'disable' a door and remove the door icon through the same process, selecting 'Disable Door'. You can toggle the opening of a door in two ways;
- Double click the door icon.
- Select 'Open Door' on the context menu
By default, only a GM can see doors on a map. If you would like your players to be able to see doors, select the option in the Settings panel. If your players are a little click-happy, you can 'Lock Door' to stop players from being able to toggle them open.
3. Using Custom Fog
Sometimes flat-colored fog isn't exactly what you're going for. If you want things to get a little fancy, Custom Fog is a great feature to spruce things up.

The basic steps are;
- Make sure your Custom Fog image is on the Map layer.
- Overlay the Custom Fog image on top of your regular map.
- On the context-menu for the Custom Fog image, select 'Convert to Fog Background'.
- Done!

Note: To remove the Fog Background, use the Fog Tool to Select the Custom Fog Background (Because it's a Fog Item now!) and select the option to Convert the item back.
3. Using Fog Effects

Fog Effects is a one-touch way of getting stylish fog effects without needing to do much setup. The flip-side is, you only have access to the ones I have created!
To add a fog-style, double-click a map to see the "Auto Fog" options.
- Effect: A list of different effects to replace the default 'fog' with.
- Style: This dictates the style.
- Map fog is generally see-through in a way that you can still see the base map through the effect (though it will still obscure tokens).
- Flat fog will block the transparency, and only display the effect as fog.
Note: Fog Effects are done via Shaders - and using a lot of them at once can cause some strain on lower-end devices. Be smart in how you set your scenes up.

Note: To remove the Fog Background, use the Fog Tool to Select the Custom Fog Background (Because it's a Fog Item now!) and select the option to Convert the item back.
Smoke: Elevation Mapping
Elevation Mapping allows you to add some depth to your 2D Scene, by assigning 'areas' to the map where certain points/tokens are higher than others.
1. How it works
When setting up elevation, you have two styles and a few layers to play with. (I've limited this to six to keep things simple, but technically it can be expanded.)
The styles are "Mesa" and "City". The idea behind Mesa style - is hills, plateaus and cliffs. With layers 1-6, the calculations become different. If you have a token and an obstruction both within a Layer 1 mapping, the token can see PAST the obstruction! But if you have a token with a Layer 1 mapping, and an obstruction within a Layer 2 Mapping, the player CANNOT see past the obstruction. Because the obstruction is at a higher depth.
The "City" style is the same as you would expect on the base layer, but for all layers.
Now for an active example (with Mesa); Here is a token on an island map. Their vision is not obstructed at all. I have toggled on the Elevation Mapping View so I can use the tools. I have used Elevation Mapping Layer-1 tool to surround the area I'm going to be working in. (This is to make sure no obstructions I draw within here end up on Elevation Mapping Layer-0, and thus always block vision.)

Next, I draw obstruction lines around the items I want to block vision. (This screenshot has the Elevation Mapping View toggled off, so that you can see easier.) Notice how the obstruction lines don't block a single thing. This is because the token AND the obstructions all exist within the Elevation Mapping Layer-1 area. So they are all at the same depth.

With the base work done, I want to make sure my rocks are higher up - so that I can't see past them when I'm on the ground, and if I stood upon them - I can see the top of them and everything below. So I'm going to use the Elevation Mapping Layer-1 Tool and draw an area around my rocks. I draw my mappings AROUND the obstructions, fairly closely. This is because if a player is standing CLOSE to the object, I do not want them to accidentally be within that mapping. Note: You can layer mappings, and the highest layer will always take priority.
Notice that while on the beach area, I can no longer see past the rocks.
 But when standing on the rocks (within Elevation Mapping Layer-1, the same that the obstruction lines are in), I can see on top of them and off the sides!

But I can still see the next rock above me.. so I'm going to use the next numbered elevation mapping tool.

Now I can no longer see to the top, but I can see below. Turn off the Elevation Mapping View so that the layers hide themselves and the effect is complete.

2. The Mapping Layer Tools
The numbered mountains on the Obstruction Tool Bar are the Elevation Mapping Layer Tools. Or "MEL" if you want to read it as Mapping Elevation Layer, which for the suck of not writing it a million times - I will. Each MEL Tool has a number next to it designating what layer it interacts with. Tier 1 is Blue colored. Tier 2 is Green colored. Tier 3 is Yellow colored. Tier 4 is Orange colored. Tier 5 is Red colored. They mimic a regular elevation map that you would see for mountains. You can stack these mappings if you want, and for any points within several shapes - only the highest mapping is considered. Meaning, if you circled your entire map in Tier 1, and then drew in the center as Tier 5 - any points in that center would be considered at Tier 5.
3. The Mapping View Toggle
The last two tools are the MEL Select Tool and MEL View Toggle. Since the layers can cause a lot of visual clutter, you need to enable the toggle in order to see/use them. This is also for people who do not want to use them do not need to see anything about it. When the View is toggled on, the MEL tools are all enabled and you can draw. When you turn the MEL View off - the information is then saved to the scene, and the visual indications of the layers are removed. To make things easier and not have to swap between different tool bars, the MEL Select Tool exists so you can grab a layer and interact with it while staying on the Obstruction Tool Bar.
Smoke: Importing Fog Files
You can find information on the UVTT Format here - ArkenForge UVTT as well as a sample file to try it out here.
UVTT Files have the .uvtt extension (Though some may differ depending on the application the VTT they were designed for). Smoke&Spectre can accept general UVTT scenes as well as ones configured for Foundry (more may be added in the future).
When importing a scene, you will be asked where you want to import the Map to in your OBR storage - and the rest will handled for you.
For the other types, it generally expects the map to already be within the scene - so select the map from the Alignment dropdown, and then import your file. It may take some trial and error depending on the DPI of the map (Not all files are made the same!). Owlbear's default DPI is 150 per grid unit.
Note: There are some exceptions to this rule, where some files are outright badly configured. There isn't much to be done in this case, so use your best judgement to align the map to the obstruction lines once they are imported.

Spectre: Usage and Use Cases
Spectre is completely different form dynamic fog, in the sense that the two have nothing to do with each other! Zip! Zero! Nothing! They are together simply because I thought combined that they created a dramatic event for scenes.
When a token becomes a "Spectre", it becomes viewable to only you. The person who has made it a spectre. You are able to see it on your screen all the same though. You are then able to select which people within your room you want to be able to view that token. Why would you want to do this?
- Perhaps you have some notes on the screen that you do not want to be 'hidden' because they become partially transparent and hard to read. If you Spectre it, it will maintain it's visibility and only be visible to you.
- One of your players is haunted by ghosts only they can see. You could Spectre a ghost, and make it only visible to them. Then when that player begins asking questions about the ghost, everyone else would just assume they are crazy - because no one else sees it.
- Maybe one of your players has Truesight. You could set up a seemingly boring room with few things in it, which is what other players would see - and then load it up with Spectre'd props like gold, bodies, books, etc that only they can see.
There's no defined list in how you go about it, but the general idea is controlling their perception (Which is very much where Smoke & Spectre intersect on their use cases.)
Spectre: How it works
Now, from a technical perspective... Spectre removes an item from the scene, and recreates it as a local item. Local items are 'temporary' items that are only seen by the creator. Local items generally have the caveat of disappearing on refresh, but Spectre snapshots everything to your scene so you will not lose your items on a refresh.
A drawback to this is that a Spectre item isn't a 'real' item. So other extensions cannot (Should not) interact with a Spectre'd token. You can still manipulate a Spectre'd token, in terms of moving and resizing it. A player can also interact with the token if they need to. The way the Spectre'd token update will be a little 'choppier' though, as again, it's not a real item so the way OBR generally animates tokens moving/resizing doesn't happen here.
From a thematic perspective, there are ways around this. You could hide the tokens before moving them, or simply wait until the token is out of their view range. Or blind your player for a moment before doing your updates. Or just.. do it in front of them. The difference isn't super noticeable, I just feel the need to point it out.
1. Who can see the token
On the Spectre Panel, when a token has been Spectre'd you'll see it pop up here. Next to the token's name is a player drop down.
You can select as many other players as you want to be able to view this token.
You can only select players that are in the room, as the list is populated based on that.
By default, when you Spectre a token you are the only person that can see it. For everyone else, it'll look as if it was deleted.

2. Where do the tokens go
Spectre'd token data is bundled up and stored in your scene. So if you decide to clear out your scene metadata, the Spectre'd token information will also go along with it. In general, scene data is rather large (it uses your OBR storage, and if you have subscribed you probably have a ton of it) - but Spectre does place a cap on how many things you can it enabled on in the scene for data transmission purposes.
Support
If you have questions, please join the Owlbear Rodeo Discord.
Or you can reach out to me at [email protected]. You can also support these projects at the Battle-System Patreon.