Marked!
Battle-System
Marked!
Can't find a token/image for the 'Sniffles' condition? Homebrew game has custom statuses that are harder to show on the fly? Marked can be used to setup custom text labels for your tokens for ease of access between you and your players.
Table of Contents
Marked!: Quick Start
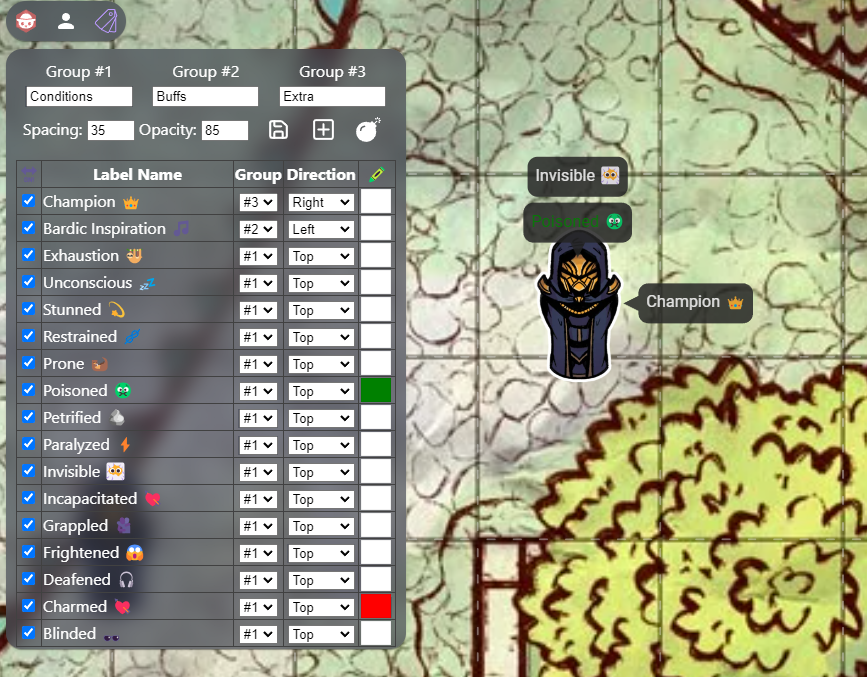
The configuration of Marked! is done solely on the GM's end. Once labels are setup (And saved!), all players in the room will have access to apply them to tokens.
By default, generic status conditions are provided so that Marked can be used straight away with no setup. Feel free to add your own labels.
Marked! UI Overview
1. Main Panel
The main panel is solely for the configuration of Marked, and during play you likely won't be interacting with it.

On the panel, we have;
- News Ticker: Random updates that scroll by to let you know at a glance of any changes.
- What's New Button: Click this to read the news/updates.
- Group Names: Marks are split into three categories. Using the three text inputs at top, you can name them whatever you would like.
- Size Input: This changes the size of the font that is used when the Mark is made.
- Opacity Input: This controls how transparent the Mark will be when it's created.
- Export Button - Export your current Mark Setup to a JSON text file.
- Import - Import a Marked! JSON text file, overwriting your current Marks.
- Save - This saves any changes, so that they are available to be used as Marks for you and your players.
- Add - This adds another Mark to the table for you to edit.
- Reset - This erases all Marked! data and sets you back to the defaults.
Note: You can right-click a Mark to remove it from the list.
As for the Marks themselves;
- Active Box: Controls whether the Mark will be available or not.
- Name Input: This is the text for the Mark. You can use emojis and/or text here.
- Group Control: Controls which group the Mark will be in. (Perhaps you want a Buff group, a Bane Group, and an Other Group.. - for easier sorting)
- Direction Control: This determines where the Mark will appear in orientation to the token. Subsequent Marks are stacked, if in the same direction.
- Color Control: This determines the color of the text for the Mark.
Note: If you click the 'Label Name' header, it'll sort the list alphabetically.
2. Sub/Context Panel
During play, you can apply Marks via the Context Menu. Right-click any Token, or click the three-dots on the normal menu.

The context menu shows all of the marks for each group that are active, as well as the group controls at the bottom.
Note: Marks that are active on a creature will be highlighted in red, for easier recognition if you need to toggle them off. You can also select a group of tokens and mark them all at once, but it will not show the highlight status in the same way (As multiple tokens could have different states for their marks).
Support
If you have questions, please join the Owlbear Rodeo Discord.
Or you can reach out to me at [email protected]. You can also support these projects at the Battle-System Patreon.