
Game Master's Grimoire
Joshua Hercher
Table of Content
- Game Master's Grimoire - Owlbear Plugin
- Quickstart
- How it works
- Adding Tokens to the Game Master's Grimoire
- Game Master's Grimoire Action Window
- Game Master's Grimoire Context Menu
- Statblock Popover
- Shared Abilities
- Party Management
- Loot Management
- Shop Management
- Custom Statblocks
- Dice Roller
Game Master's Grimoire - Owlbear Plugin
Designed for DnD 5e and PF2e this extension allows tracking and changing Players and Creatures' settings and statblocks while dynamically hiding and showing this information to players.
Check out the Tutorial Check out the Battle Demo
Quickstart
This section is intended to describe and show an example of how fast a combat sequence can be setup using Game Master's Grimoire (GMG).
Scenario
Your players rest at a campsite, but they fell asleep during their watch and were surprised by an Ogre and five Hobgoblins. We quickly roll initiative sort the Tokens so we know whose turn is next and start doing damage.
How
- Create a new scene based on a map you have in your collection.
- Drop all the PC Tokens you need and fill in their info (or create custom statblocks for your PC).
- Drop an Ogre and Hobgoblin Token on scene and connect them with their statblocks (this will be done automatically for all statblocks where a matching entry is found)
- Copy the Hobgoblin Token four times
- Roll initiative for the whole group and sort by initiative
- Optional:
- Activate the participating groups for battle
- Start the battle using the "Start Battle"-Button
- Use The "Next" or "Back" button to circle through the battle participants and highlight the current token.
Video Example
Because the documentation currently requires gif for moving content the quality and length is limited, for better video quality consider going to the discord.
How it works
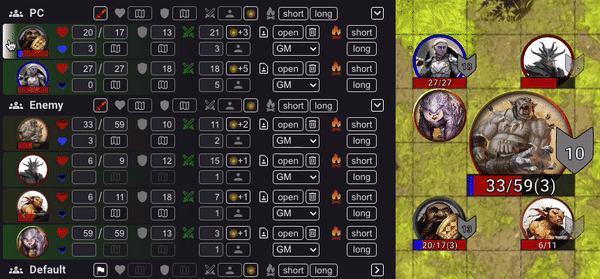
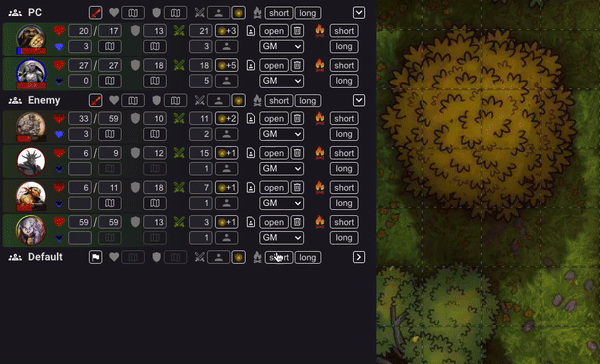
The extension has three windows:
- Game Master's Grimoire Action Window
- Game Master's Grimoire Context Menu
- Game Master's Grimoire Statblock Popover
As well as the following on-scene information:
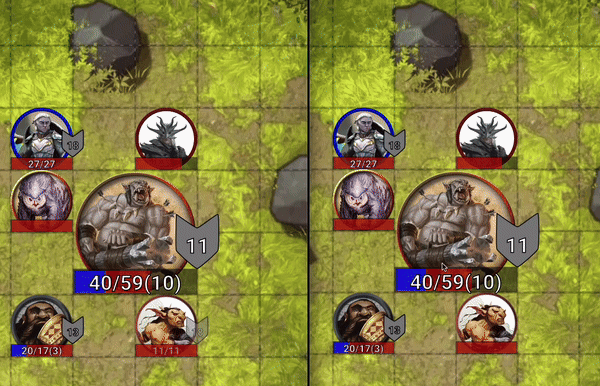
- HP Bar
- HP Text
- AC Text
- Token Highlight (battle)
Adding Tokens to the Game Master's Grimoire
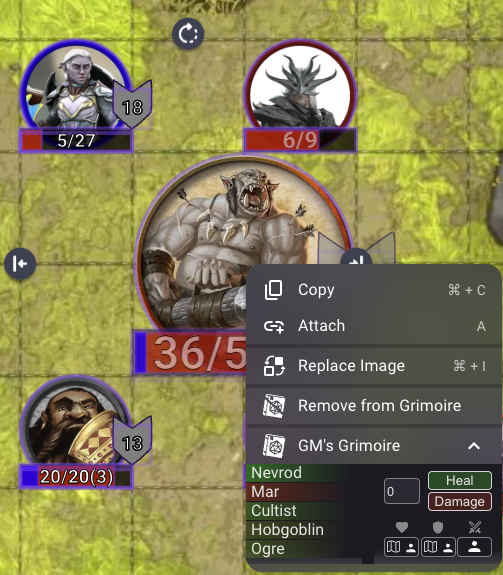
Tokens that have not yet been added to the GMG have the following icon present when their context menu is open (right click on token):
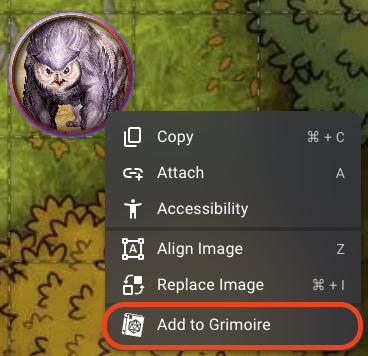
Clicking this icon adds the token to the GMG and you can see its name appear in the extension's Action window. You can select multiple tokens and activate them all at once. When first clicked all the initial information is added to the tokens metadata, by default the name of the token is used, to make loading statblocks easier. If the token has a label, this value is taken instead. GMG ignores name postfixes like "A" or "A1" when searching for statblocks.
Once the GMG is active you can remove the token from the GMG again by clicking the Deactivate GMG Icon in the Context Menu:
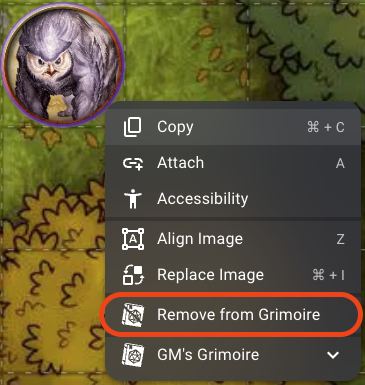
This does not remove the Tokens metadata so in case you want to reactivate the GMG all previous information is still stored with the token.
Once a Token is deleted from a scene all the attached metadata is also removed so this cannot be undone.
In case you have a creature token multiple times within the same scene, it's easiest to setup one token and then copy it as often as you need, because the GMG information will be copied as well. This saves a lot of time when setting up scenes.
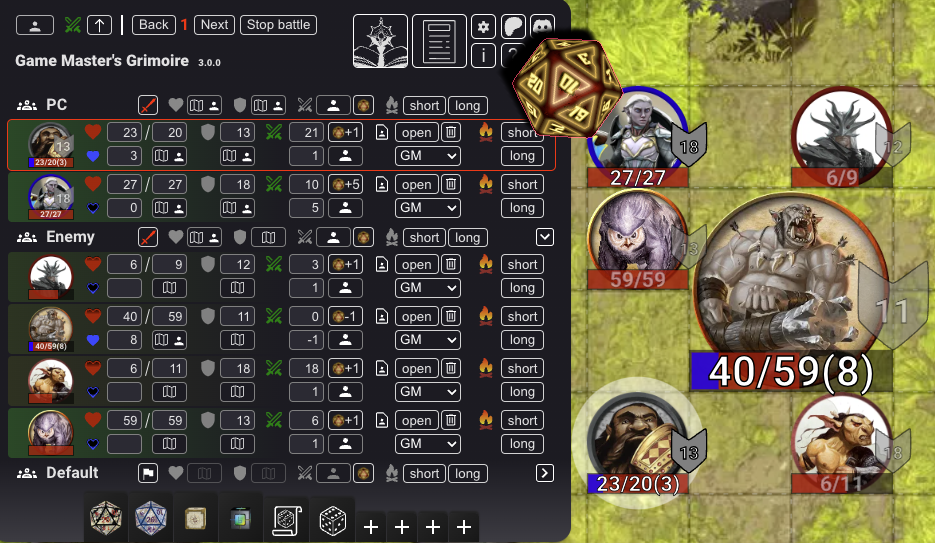
Game Master's Grimoire Action Window
The Action Window can be opened by clicking the GMG Action Icon in the Owlbear scene. It is meant as a place for the GM to setup his scene and creatures in it. It is also available for players in a simplified form see Player Action Window;
Version Information and Help Buttons
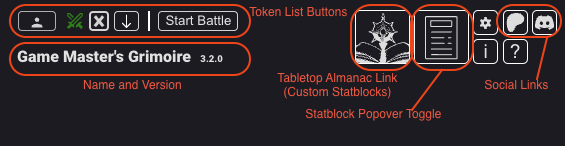
At the top of the action window the current version of the extension is displayed as well as the link to the Tabletop Almanac (to create custom statblocks), four system buttons, the statblock popover button, a link to the GMG Patreon page, a link to the GMG/Tabletop Almanac Discord, and the Token List Buttons.
The system buttons open a new modal:
- The [⛭] buttons opens the Settings.
- The [👤] button opens the Party Management.
- The [i] button opens the changelog so you can see recent changes
- The [?] button opens the help menu which displays the same help information you are currently reading
The statblock popover button opens a popover, for more information see here.
The TA Link, Patreon Link and Discord Link open in a new window.
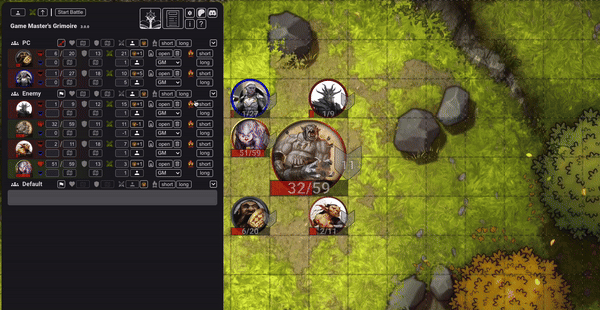
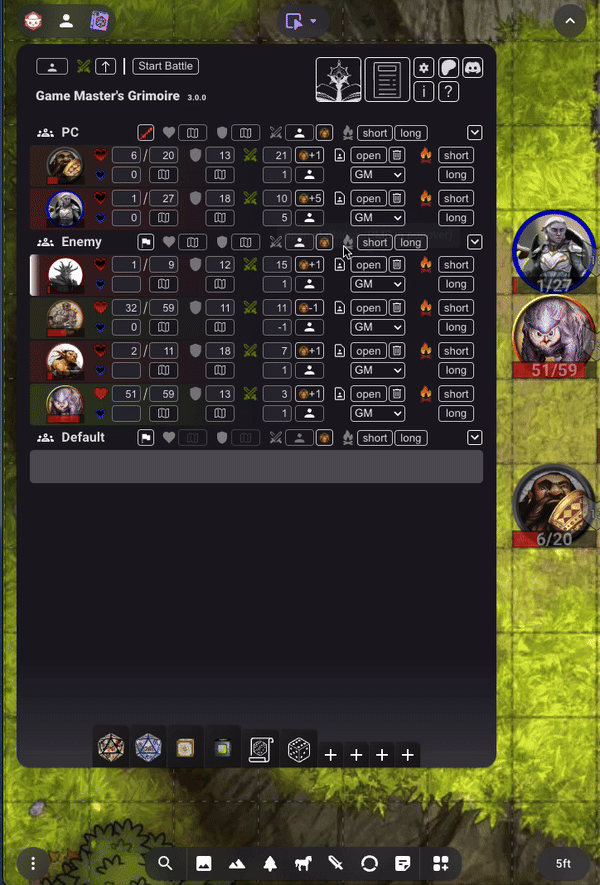
Token List Buttons
The Token List Buttons are always visible and stick to the upper left corner, even while scrolling down and consist of two parts:
- The Token List Settings
- The Battle Buttons
The Token List Settings consist of the "Player Preview Toggle"-Button, "Toggle Battle Focus"-Button, and the "Sort by Initiative"-Section. When the "Player Preview" is active, the Token Images in the Token List display an approximation of what players will see (HP Bar, HP Text, AC). When activating "Battle Focus" the UI gets smaller and only shows the elements necessary to manage a battle.
When the Sort by Initiative Checkbox is active you can choose between ascending and descending to automatically sort all tokens in all groups by initiative. New Tokens added to a group will also automatically be sorted by initiative. You will still be able to sort Tokens manually if they have the same initiative value and the same initiative bonus.
When the auto sorting toggle is deactivated you can sort the Tokens in any order you want by manually dragging them into their position.
The Battle Buttons come in two versions:
- No battle active
- Active battle
When no battle is active the "Start battle" button can be used to start a battle. But only if a group is marked to participate in a battle and this group contains Tokens. If no group or token is ready for battle the button is disabled and has a red background. A tooltip explains why no battle is currently possible.
When an active battle is going on then this section displays
Settings
Settings are grouped into three categories:
- Room Settings - affecting all scenes in the current room
- Scene Settings - affecting only the current scene
- Tabletop Almanac Settings - only available on TA
Room Settings
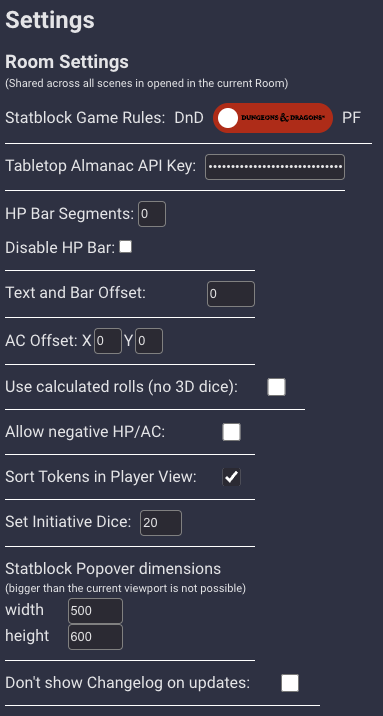
The following settings are available:
- Statblock Game Rules: You can choose between DnD 5e and Pathfinder 2e as source for your statblocks. This will impact what statblocks are found, how they are displayed, and the content (including spells).
- Tabletop Almanac API Key: Here you can enter the Tabletop Almanac API Key to access your custom statblocks
- HP Bar Segments: This setting can be used to obfuscate the real HP loss of a creature. E.g. when set to "2" the HP Bar differentiates between 3 states: Full HP, less than half HP, and 0 HP. When changing the settings HP Bars are not updated until the HP value is changed at least once.
- Disable HP Bar: In case you don't want to display any HP Bar you can check this setting here.
- Text and Bar Offset: To have a more flexible positioning of the HP Bar and Text, a value can be entered (negative or positive number) and the position of the HP Bar and Text is then adjusted by this value.
- Armorclass Icon and Text Offset: To have a more flexible positioning of the AC Background and Text an offset for the X- and Y-Axis can be added. This value is scaled considering the Token size.
- Dice Roller: You can select which Dice Roller you want to use. By default the dddice roller is selected but you can also use the Simple Dice Roller or the Dice+ extension.
- Allow negative HP/AC: By default negative HP and AC are not allowed but when this settings is checked then HP and AC can be set to negative numbers. The HP Bar will always display negative HP the same as when it is 0.
- Sort Tokens in Player View: When active, the Player Action Window will display Tokens ordered by their initiative value. If not active, Tokens will have the same order as they were added to the scene (so kind of random).
- Set Initiative Dice: This setting decides with which "dice" the roll initiative button in the groups and the token works. The default is 20, meaning a value from 1 to 20 (excl. modifiers) can be rolled. By setting it to 10 the value can only range from 1 to 10. When using 3D dice only values that are available in the selected theme should be used.
- Statblock Popover dimensions: This setting allows to set the width and height of the statblock popover. The default is 600x500. When changing the value (either press enter or move cursor outside of input field) while the statblock popover is open the size of the open statblock popover is automatically adjusted so you can preview what size fits you. The width and height cannot be lower than 200 and settings bigger than the viewport will be overwritten by the max viewport size.
- Don't show Changelog on updates: This will disable the automatic popup when a new version of GMG is loaded. If not selected a notification will be shown once the update process has been finished and the changelog icon will flash for 30 seconds to indicate that there are new changes available.
Scene Settings
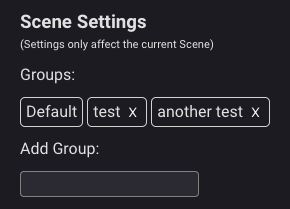
- Groups: This setting allows you to define different Groups used for ordering Tokens. There is a permanent "Default" group. The groups can be rearranged by dragging and dropping them in the desired order. To add a group use the text input below the group list. Press "Enter" to add a group to the list. Tokens in the GMG remember their group association (if the group is deleted) but are added into the default group until they are moved to a different group. So deleting and re-adding the same group restores the previously associated tokens to that same group.
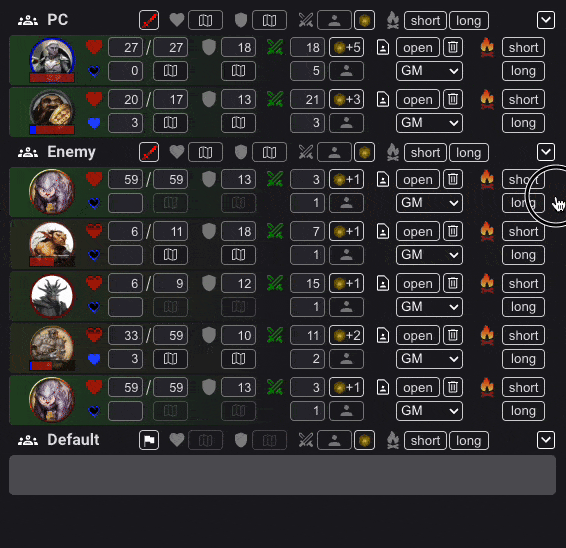
Token List
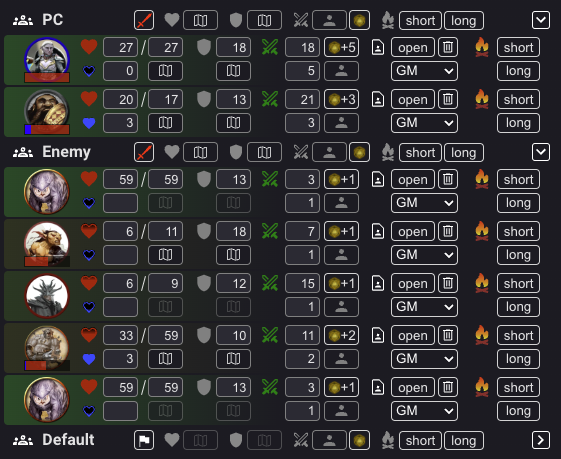
The Token List consists of groups and tokens associated with each group. GMG remembers which groups are open or collapsed between sessions. Collapsing a group hides the tokens it contains in the list, but they are still tracked by the GMG and the Popover is still available.
Tokens can be moved between groups or reordered inside a group by dragging and dropping. By default, this has no effect on the Player Action Window but when the setting "Sort in Player View" is active, the Tokens in the Player Action Window are sorted by their initiative value regardless of group.
When a selected Token is moved all selected Tokens in the same group are moved as well.
Clicking a token results in the corresponding item in the scene to be selected. To Select multiple tokens hold "SHIFT", "CTRL", or "CMD" and click token names in the list. Just like in other programs, holding "SHIFT" and clicking a Token selects all Tokens between the clicked and the nearest selected Token.
Selecting token names in this way causes the Owlbear Token Contextmenu to open. When selecting multiple tokens names only the context menu for the first selected token is opened, but all items are selected.
Double-clicking a token focuses the scene on the corresponding icon:
Group
GMG's groups offer a lot of functionality besides grouping tokens together. There are multiple reasons to consider groups:
- For larger maps it makes sense to group creatures of areas together to keep a better overview
- collapsing groups of creatures currently not seen by the players
- keeping an overview over which creatures will be fighting in the next battle.
- The group buttons allow you to change every token of the group at the same time
- You want to keep a group as reserve not yet part of the initiative order and activate it once it's time
Each group shows the following things:

- Group name
- Add to Battle Button: The sword is shown when a group is part of a battle, the white flag if it's not.
- HP Map Button: Click to display HP on the map, right click to let players see the exact HP data
- AC Map Button: Click to display AC on the map, right click to let players see AC data
- Initiative Section: Click the button to toggle Tokens in the Player Action Window, click the dice button to roll Initiative for all tokens.
- Rest Section: Click "short" to perform a short rest (currently only resets abilities). Click "long" to perform a long rest, which heals all tokens and resets their abilities (like spell slots).
- Collapse Button: Click to show or hide tokens in the Action Window
Token
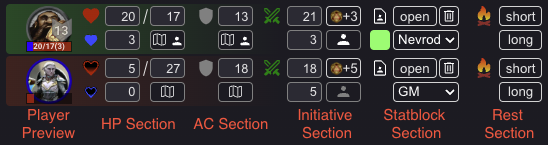
A token in the GMG represents a single Owlbear Item where the GMG Extension has been activated. It consists of the following parts:
- Dynamic Color Background (based on ratio between HP and max HP)
- Player Preview
- Shows an approximation what players will see
- Long Press the Icon to resync the Token with TA (if you changed any values there)
- HP Section
- Red Heart shows the current HP state
- Blue Heart shows if temporary HP are active for a token
- current HP / max HP on the top row
- temp HP / Map Button on the bottom row
- AC Section
- Input for the AC
- Map Button
- Initiative Section
- Input for the current initiative
- Dice Button to roll Initiative (automatically sets the current initiative) with initiative bonus modifier
- Input for initiative Bonus
- Is automatically prefilled by the selected statblock (DEX modifier for DnD and perception value for PF2e)
- Player List Button: When selected the token shows up in the Player Action Window
- Statblock Section
- Open the assigned statblock or delete it
- If no statblock is assigned open the statblock search
- transfer token ownership to a player
- If this is set, a square in the players color indicates that this token is assigned to a player
- This player will have full access to the statblock
- This player will see this token in their Player Action Window (no matter the Player List Button setting)
- This works together with Smoke & Specter token ownership as it uses the base owlbear rodeo token ownership setting
A token that is selected in the scene has a white border. A token whose turn it is in the current battle has a red border.
Map Button
The Map Buttons allow you to add information to the owlbear rodeo scene and control its visibility for players. A left click either activates or deactivates the element on the scene (this is context based either HP or AC). A right click toggles the visibility for the players. If the button is generally deactivated then nobody can see the information.
Changing Values
Values can be changed in a few different ways:
- Arithmetic operations: for the HP field the value can be changed via arithmetic (+ and -) operations. If the current value is
"10"and you edit the field like this"10 + 3"the field value will be changed to"13"once you select anything outside of the field or press enter. - Arrow Keys: when focus is on HP, maxHP, tempHP or AC you can increase or decrease the values by 1 by pressing up or down arrow key respectively
- Entering a number: when focused on any field, you can delete its content and enter a new value.
- Note that changing the maxHP or tempHP field influences the HP field.
- Rolling Initiative: When clicking the Initiative Button a random number between 1 and the chosen Initiative Dice (default: 20) is rolled and the dexterity modifier (5e) or perception (pf2e) from the Statblock (if selected) is added and entered as the final initiative value. You can also change the initiative bonus to any number, once a statblock is assigned. By default a 3D dice is rolled to determine the random value.
Note: The HP value can never exceed the maxHP value (except when maxHP is 0). It can also not be a negative number if the Setting for "Allow negative numbers" is not selected. All symbols except numbers will be removed to maintain a compatible value.
Temporary Hitpoints
Temporary Hitpoints follow these rules:
- Adding temporary hitpoints increases the current hitpoint maximum as well as the current hitpoints.
- Once temporary hitpoints are active, decreasing normal hitpoints removes the same amount of temporary hitpoints. E.g. if a token has 5 temporary HP, and takes 3 HP damage, the temporary HP are now at 2.
Initializing Token
To initialize a Token there are two approaches:
Tabletop Almanac Statblocks
If you are using a creature that is available on Tabletop Almanac you can use the statblock feature. The statblocks from Tabletop Almanac include most of the statblocks that use the OGL. This includes DnD 5e and Pathfinder 2E statblocks. For switching between rulesets see Settings.
Manual Initialization
When initializing manually you enter the 6 available fields manually. Normally the HP value cannot exceed the maxHP value but while maxHP is still 0 entering the HP value also sets the maxHP value. This allows for a quick initialization by pressing Tab to jump between the input fields.
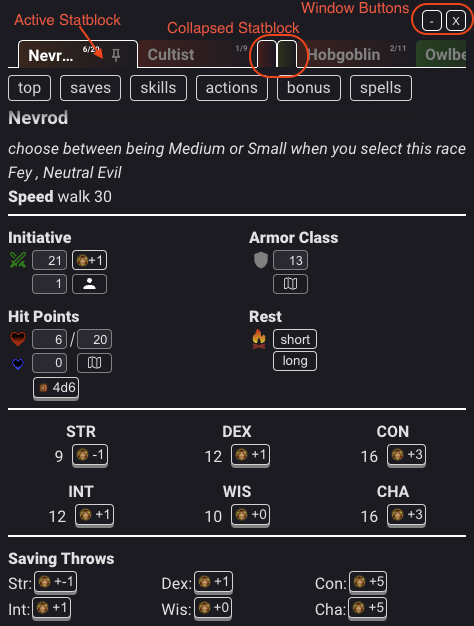
Statblock
The statblock offers a search field for creature statblocks found in the Tabletop Almanac. By default, the Token Name is used to make an initial search. If the Token name has a modifier like A, B, A1, C, 1, 3, or similar at the end it will be automatically ignored for the search.
All results for the current search are displayed with their HP, AC and CR visible.
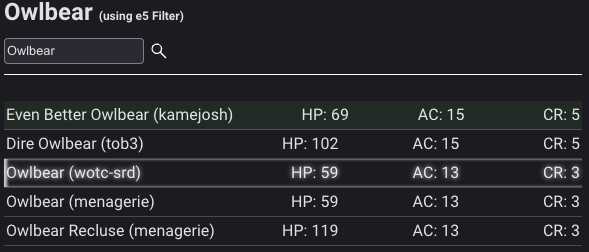
Available Statblocks have varying background depending on their source. Custom Statblocks created on Tabletop Almanac are displayed first and with a slight green background. The currently selected statblock has a white glow.
By clicking on one of the options this statblock is selected for the Token. If there are no values set for the Token or the Token still has its automatically assigned values, the values of the creature statblock are automatically used.
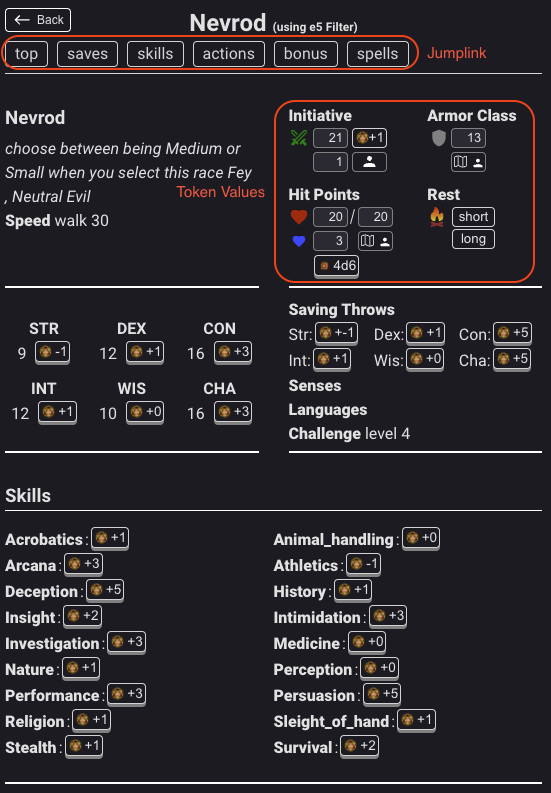
The statblock shows all the creature information including available spells and detailed spell information. At the top is a section with jump links, that lets you quickly navigate to the different statblock sections.
The Token Values section works the same as the token in the Action Window.
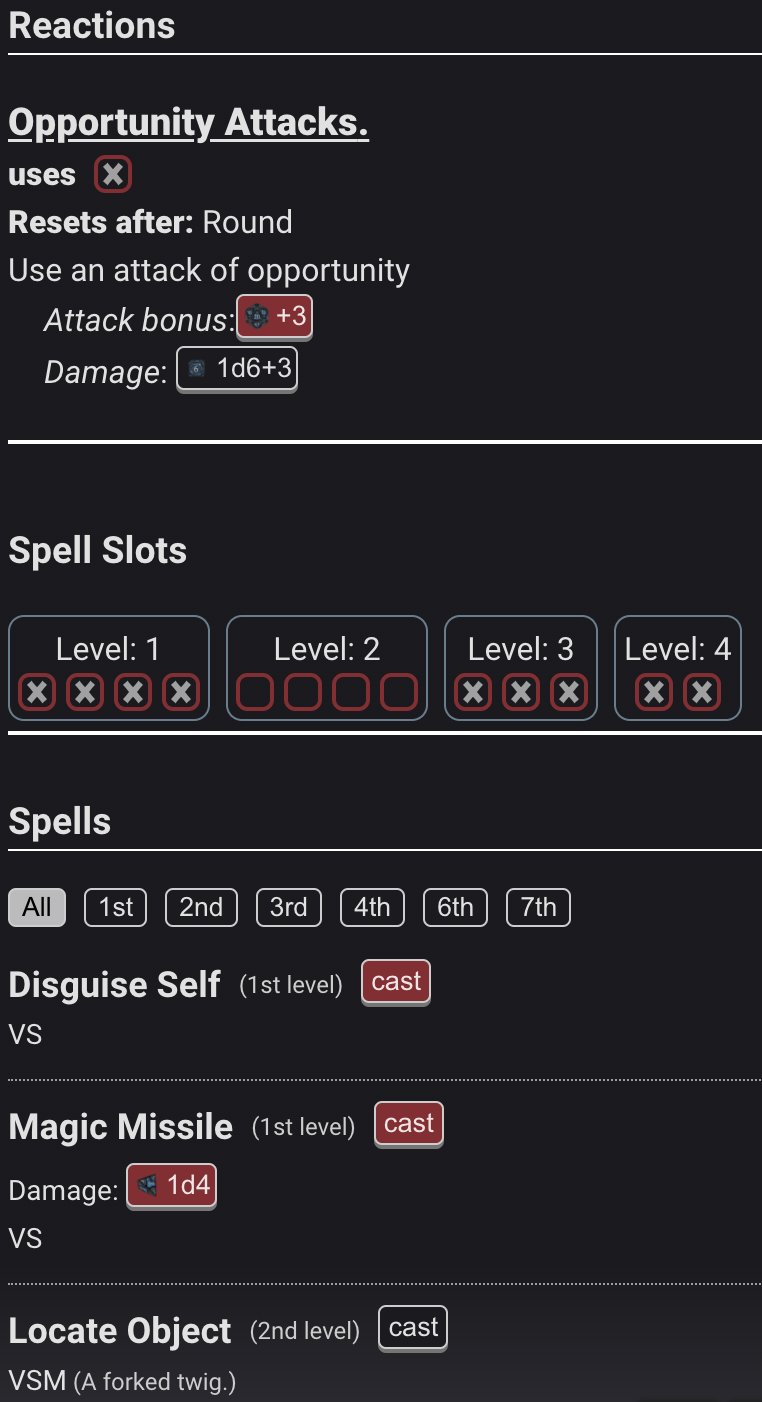
Limited Abilities
Custom Statblocks can define limited abilities (see this video tutorial). These limited abilities allows to track how many uses are left and when those limits are refilled. This can be used for Death Saves, Spellslots, Actions, Abilities, Hitdice and whatever you can think of.
There are a few automations in place to make tracking easier.
- If an ability has a "to hit" button this button will automatically mark off one use after clicking.
- If no "to hit" button is available any other dice button will mark off one use after clicking.
- All spells include a "cast" button (if spellslots are defined) that mark of one use after clicking (but the rules above are still true).
The rest buttons automatically refill limited abilities where the reset value has been set to short or long rest.
Buttons that trigger uses being consumed will indicate that no uses are left by being highlighted. The buttons will still work while being highlighted.
To create custom statblocks go to Tabletop Almanac and create a free account.
Player Action Window

The Player Action Window has reduced functionality compared to the GM Action Window. Tokens that have the Player List Button active or are assigned to the player show up in this window. Tokens that are invisible (hidden) within the scene don't show up here, except for Tokens assigned to the current player and tokens where HP and AC are revealed to the player.
For tokens that have their HP and AC revealed to the players their values are shown. Tokens that are assigned to players also have an option to access the assigned statblock. Otherwise, just the dynamic-color background is there to indicate the current status of the creature.
Tokens don't follow the drag and drop order in the GM Action Window. But when activated in the Settings Tokens will be ordered by their initiative value, disregarding which group they belong to.
Game Master's Grimoire Context Menu
The GMG Context Menu comes in two versions depending on how many tokens are selected.
Single Selection
The GMG Context Menu is a simplified version of the Action Window Token
For the GM all options except rest and statblock are available. And Initiative can only be rolled without 3D dice:

For the Players, only tokens that they own will show this popover, but the Map Buttons and Player List Button are not available.
Multi Selection
When multiple Tokens are selected, the names of the selected tokens are displayed as well as their general state (background color). And Options to either heal or damage all of them at once. For GMs there is also the options to change the visibility settings for all Tokens at once.
This can be used to do AoE damage or healing without entering the values for each Token. This also handles tempHP, maxHP, allowed negative values and every other system in GMG automatically.
Statblock Popover
Every Token that has a statblock assigned automatically shows up in the Statblock Popover. For Players only the tokens which they own show up in the Statblock Popover.
The Popover contains two window buttons:
- Minimize: Reduces the height of the popover to 100px.
- Close: Closes the Popover
The Popover displays all available statblocks indicating which statblock is currently displayed in detail.
By default when selecting a Token either in the Game Master's Grimoire Action Window or in the Scene. The associated statblock of the selected Token is displayed except when the statblock is collapsed. This can be prevented by "pinning" a statblock. While pinned no automatic switching is done even when another statblock is selected. To reactivate automatic switching unselect the pin on the currently active statblock.
Shared Abilities
The Statblock Popover also shows a list of all abilities that have been shared with you. You can pin and search these abilities. They are still connected with the token they've been shared from, so in case you use a limited ability it will reduce the uses for the statblock.
Party Management
See the Tutorial for a walkthrough of the party management features.
Party Management allows tracking group resources like items, money, and shared links. It can be accessed via the [👤] button in the action window top bar.
To use party features, you must have a valid Tabletop Almanac API Key entered. All party data, including tokens, inventory, and currency, is automatically synced with your Tabletop Almanac account, ensuring your data is safe and accessible across different sessions and devices.
When a token associated with a party member is added to a scene, it will automatically continue where it left off, restoring its previous HP, AC, inventory, and other status details.
Party Inventory
The Party Inventory is a shared storage space for all party members.
- Adding Items: Items can be added by searching the Tabletop Almanac database.
- Exchange: Items can be moved between individual player inventories and the party inventory. Players can "take" items added by the GM, equip them, and they will automatically appear in their statblock and sync to Tabletop Almanac.
- Tracking: Each item tracks its quantity and can have detailed descriptions or stat modifications.
Party Money
Tracks the party's shared currency.
- Supports standard currency types (Platinum, Gold, Electrum, Silver, Copper).
- Players and GMs can add or remove currency from the pool.
- Players can manage their assigned Party Token's money and inventory directly, with all changes syncing instantly to Tabletop Almanac.
- Every change is logged to keep track of the party's spending.
Party Links
A place to store and share important URLs for the party, such as shared notes, map links, or external handouts.
Party Statblocks
All statblocks that you added to the party are shown here. You can change their equipment and money directly. If an Image is shown the party member is connected with a OBR Token and the Token will be auto initialized when added to a new scene.
Player View
Players can see all members of the party but can only edit their assigned Party Members. They can move equipment to the party inventory and back or exchange money with the party. All changes are synced instantly to Tabletop Almanac so you can always continue your session where you last left it.
Loot Management
Loot Management allows Dungeon Masters (GMs) to manage items and currency directly on Owlbear Rodeo tokens. It provides a streamlined way to handle loot drops and distribute rewards to players.
All looting information is persisted on Tabletop Almanac, ensuring that loot remains consistent across different scenes and sessions.
Summary
The Loot Management feature solves the problem of tracking rewards and inventory for individual tokens (e.g., a defeated boss or a treasure chest) within Owlbear Rodeo. Instead of manual notes, GMs can attach items and money directly to a token's metadata. Players can then interact with these tokens to view and claim their rewards, which are automatically synced to the party's inventory or individual player statblocks.
User Workflow
Game Master Workflow
- Initialization:
- Select a token in the scene.
- Open the Loot Management window.
- If the token has no loot metadata, click the "Initialize" button.
- Managing Money:
- In the Money section, GMs can add or remove currency (Platinum, Gold, Electrum, Silver, Copper).
- Arithmetic operations (e.g.,
+50) are supported for quick updates.
- Managing Items:
- Add Item: Click the [+] button to search the Tabletop Almanac database and add items to the token.
- Loot Suggestions: Click the magic wand icon to get matchting loot suggestions based on the token's statblock or the party's average level.
- Remove Item: Click the delete icon next to an item to remove it from the token.
- Toggling Visibility:
- Use the "Lootable / Locked" toggle in the header to control whether players can see and interact with the loot.
- GMs can also toggle the visibility of the token itself directly from the loot selection screen.
Player Workflow
- Accessing Loot:
- Select a token that has been marked as "Lootable" by the GM.
- Open the Loot Management window.
- Viewing Rewards:
- Players can see the list of items and the amount of money available on the token.
- Transferring Loot:
- Transfer Items: Click the transfer icon next to an item. Players can choose to move the item to the Party Inventory or directly to a Party Member's Statblock they have been assigned to.
- Loot Money: Click the "Loot Money" button to transfer currency to the party's shared funds or a specific member.
- Automatic Sync:
- Once an item or money is "taken," it is removed from the token and added to the selected destination on Tabletop Almanac instantly.
Shop Management
Shop Management allows Dungeon Masters (GMs) to create interactive shops directly on Owlbear Rodeo tokens. This feature enables a streamlined shopping experience where players can browse items, manage a personal cart, and purchase goods.
Like Loot and Party management, all shop transactions are synced with Tabletop Almanac to ensure persistence across sessions.
Summary
The Shop Management feature facilitates in-game commerce by allowing GMs to attach an inventory and price list to any token. Players can interact with these "merchant" tokens to see available stock, add items to their shopping cart, and checkout. The system automatically handles currency transactions and updates both the shop's stock and the player's inventory.
User Workflow
Game Master Workflow
- Initialization:
- Select a token in the scene (e.g., a merchant NPC or a storefront).
- Open the Shop Management window from the context menu.
- If the token has no shop metadata, click the "Initialize" button.
- Inventory Management:
- Add Item: Click the [+] button to search the Tabletop Almanac database and add items to the shop.
- Pricing: Set the cost for each item in the inventory.
- Stock Control: Specify the quantity available for each item. Stock is automatically decremented when players add items to their carts.
- Shop Suggestions: Use the magic wand icon to generate thematic shop inventories based on the merchant type or location.
- Managing Funds:
- The Funds section allows GMs to manage the currency held by the merchant.
- Shop Status:
- Use the "Shop Open / Closed" toggle in the header to control player access. When closed, players can see the shop exists but cannot browse or purchase.
- Active Carts:
- GMs can see all active player carts for the current shop, allowing them to monitor what players are considering.
Player Workflow
- Browsing the Shop:
- Select a merchant token and open the Shop Management window.
- Browse available items, viewing their descriptions and prices.
- Managing the Cart:
- Add to Cart: Click the cart icon on an item to add it to your personal shopping bag.
- View Cart: Click the bag icon in the header to review your selected items and total cost.
- Remove Items: Remove items from the cart if you change your mind; stock will be returned to the shop.
- Checkout:
- Select Customer: Choose which party member is making the purchase.
- Purchase: Complete the transaction. Items are automatically added to the player's statblock and currency is deducted.
Custom Statblocks
Custom statblocks can be created on Tabletop Almanac. Free accounts can create up to 20 statblocks and activate 10 statblocks at the same time. To increase this limit go to my patreon and consider supporting me.
Dice Roller
GMG comes with an integrated dice-roller. It can be disabled (removed) by changing the Disable Dice Roller Setting;
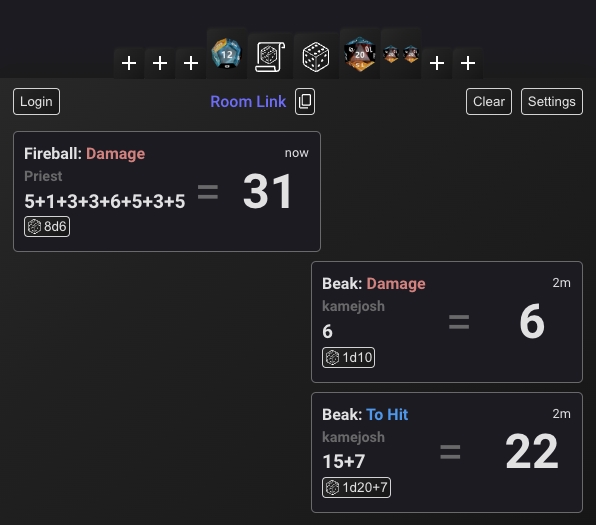
Getting Started
By default GMG uses the same account and room that dddice uses. So if you were already using dddice everything is setup. If you were not using the dddice extension you will be given a guest account and start a new dddice room. You should be able to start rolling dice after a few seconds where everything is setup.
If you are using a guest account, the username that will appear under your rolls will be your owlbear username (or owlbear guest name). If you are logged in with you dddice account your dddice username will be used.
You can now click on any dice button in your statblocks and the dice will automatically roll.
dddice login
The login process is the same with the official dddice extension (as this integration was done with their help). When you open the roll log (scroll button on the bottom of the Action Window) you will se a Login Button on the top left of the Roll Log. When you click this Button an overlay appears. Just click the purple link and you are done. It might take a few seconds to register the login. If the overlay doesn't disappear after 5 seconds you were already authenticated, if that is not the case please let me know.
Dice Settings
When the Roll Log is open there is a settings button on the top right side of the roll log.
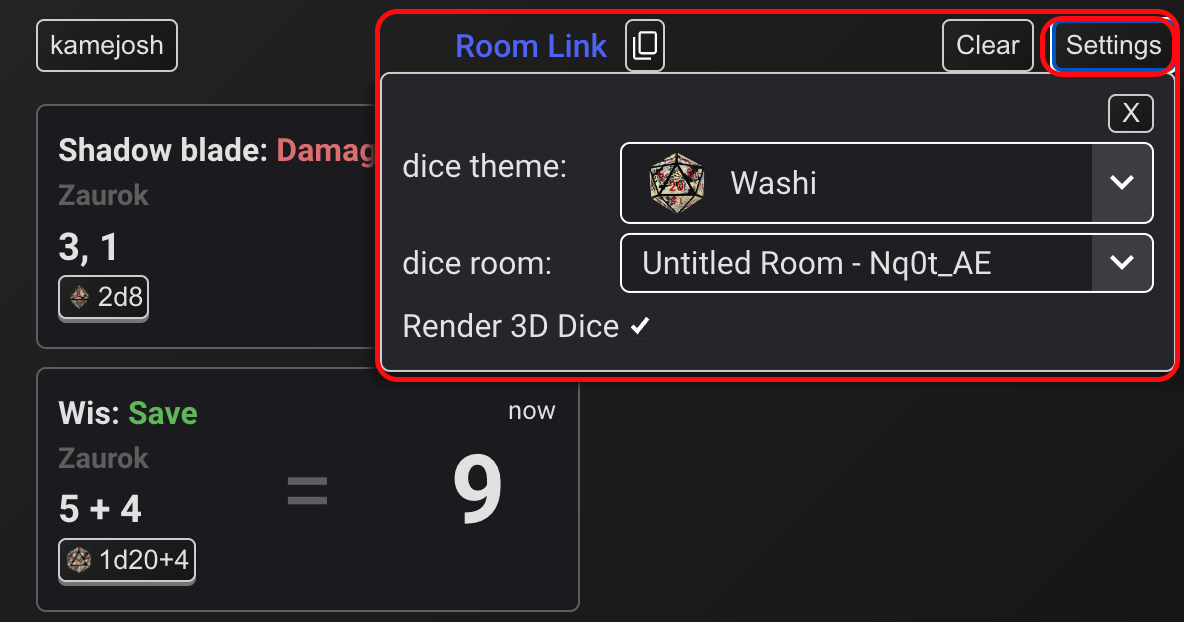
There are currently two settings:
Dice Theme
Each Owlbear user can choose their own dice theme (and the other users will see them roll with this theme). When logged in the dropdown menu list all compatible dice themes (theme has d4, d6, d8, d10, d12 and d20 with matching labeling) will be shown. Users can switch between those themes. Guest users only have access to the default dddice theme (bees).
dddice Room
You can change the dddice room you want to use directly in this settings menu. Just select the room you want and every player will automatically join this room as well.
3D Rendering
You can choose to use the 3D rendering of dddice, this is the default option. Should you already use the dddice owlbear extension you might want to turn HP Trackers dice rendering off to not have multiple dice showing the same thing.
Using The Dice Roller
By default all rolls are seen by all players. GMs can set their own roll to be hidden by default in the Tabletop Almanac Settings.
There are multiple ways to use the dice roller:
- Dice Buttons in Statblocks
- Initiative Buttons
- Custom Roll Buttons
- Quick Roll Buttons
Dice Buttons in Statblocks
Each rollable element inside a statblock is replaced by a dice button. Some of them might not make sense but the rule is as long as the text can be transformed to a rollable string it will be rollable.
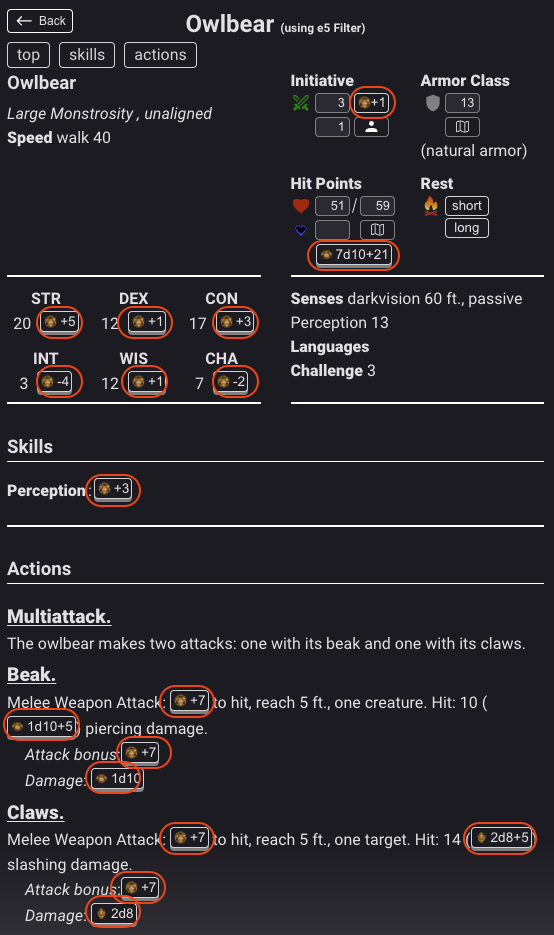
While hovering over a dice button the little dice inside the button begins to shake and a list of optional parameters is shown.
These optional parameters are:
- ADV
- changes the dice roll to 2d20kh1 (roll 2 d20 and keep the highest one) + modifier
- DIS
- changes the dice roll to 2d20dh1 (roll 2 d20 and drop the highest one) + modifier
- HIDE
- Dice roll will only be visible for you other people will not be notified and it will not show up in their dice log
Dice that are marked as Damage Dice have optional roll button:
- CRIT
- automatically rolls the damage as a crit based on the selected crit rules on Tabletop Almanac

ADV and DIS are only available on d20s HIDE is available on all dice and CRIT is only available on Damage Dice.
When rolling Dice Buttons in statblocks the dice context is set as meaningful as possible. This means attack rolls usually contain the attack name and "To Hit", and Damage rolls usually contain the attack name and "Damage". This is not always possible but should be close enough.
Initiative Buttons
Initiative Buttons can be used to roll for an individual entry or for the whole group. When rolling for the whole group a roll is triggered for each token in the group and will show up as individual roll in the roll log.
Custom Roll Buttons
At the Bottom of GMG there are 8 freely assignable buttons where you can create your custom presets. You can see the documentation for custom dice rolls here. To get started click on a button with the "+" sign. A text input is opened where you can add your roll preset, if the preset is not valid the text input will be red. The dice roll will not be saved until a valid string has been found. To save the custom string press Enter or the "√"-button.
Custom Roll Buttons are automatically assigned with dddice Dice Box presets where one dice is assigned to a free custom dice button. All already prepared or once deleted custom dice buttons get no value assigned.
You can also choose a different theme than the main theme for your custom dice button by selecting the theme from the theme selector, this also includes themes not selectable as default theme.
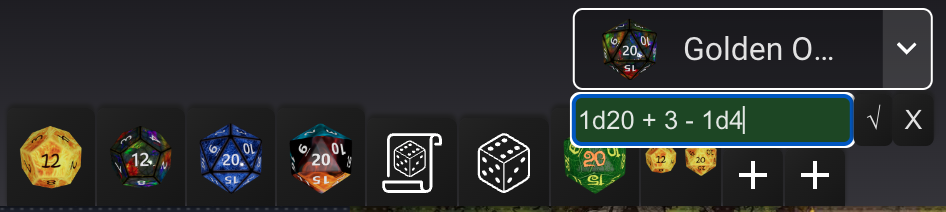
Once the preset has been saved the button will show up to 4 parts of the dice equations to make it easier to identify which button does what. It will also display the full dice command when hovering over the button.
To remove a preset hover over the button and press the now visible x-button in the top left corner. This delete button is off to the side and really small by design to make accidentally pressing it on mobile harder.

Custom Dice Buttons are saved to your browsers localstorage. This means they will not be available on other devices or other browsers. Or you have to set them up there as well.
Quick Roll Buttons
The Quick Roll Buttons is the button next to the Roll Log toggle button. It will always display all available dice in the selected theme to quickly roll them. It also contains a text input field where you can enter a valid dice string and roll it without saving it.
DnD Beyond Dice Rolls
Using dddice you can roll dice in your DnD Beyond Character Sheets and see those rolls directly in Owlbear Rodeo. All you have to do is:
- Install the dddice browser extension
- Open your DnD Beyond Character Sheet in this browser
- Open the Dice Log in GMG
- Copy the link to the dddice room
- Paste this link into the dddice browser extension (you must be in the DnD Beyond tab)
- start rolling
Simple Dice-Calculator
When in the Settings the option "Use calculated rolls" is activated, dddice is disabled. GMG will then use a local script to calculate the result of the chosen dice-roll and use the OBR broadcast API to notify all connected players of the result.
The simple dice-calculator uses the rpg-dice-roller package under the hood. Available dice notations for custom dice buttons and the quickroll function can be found here.
Dice Plus
Since version 3.5.0 GMG supports Dice+ as a dice roller.
After installing the extension, you have to reload website (so that GMG ad Dice+ can exchange setup data with each other) and select the Dice+ extension as you dice roller in the settings.