
Game Master's Daggerheart
Joshua Hercher
Game Master's Daggerheart
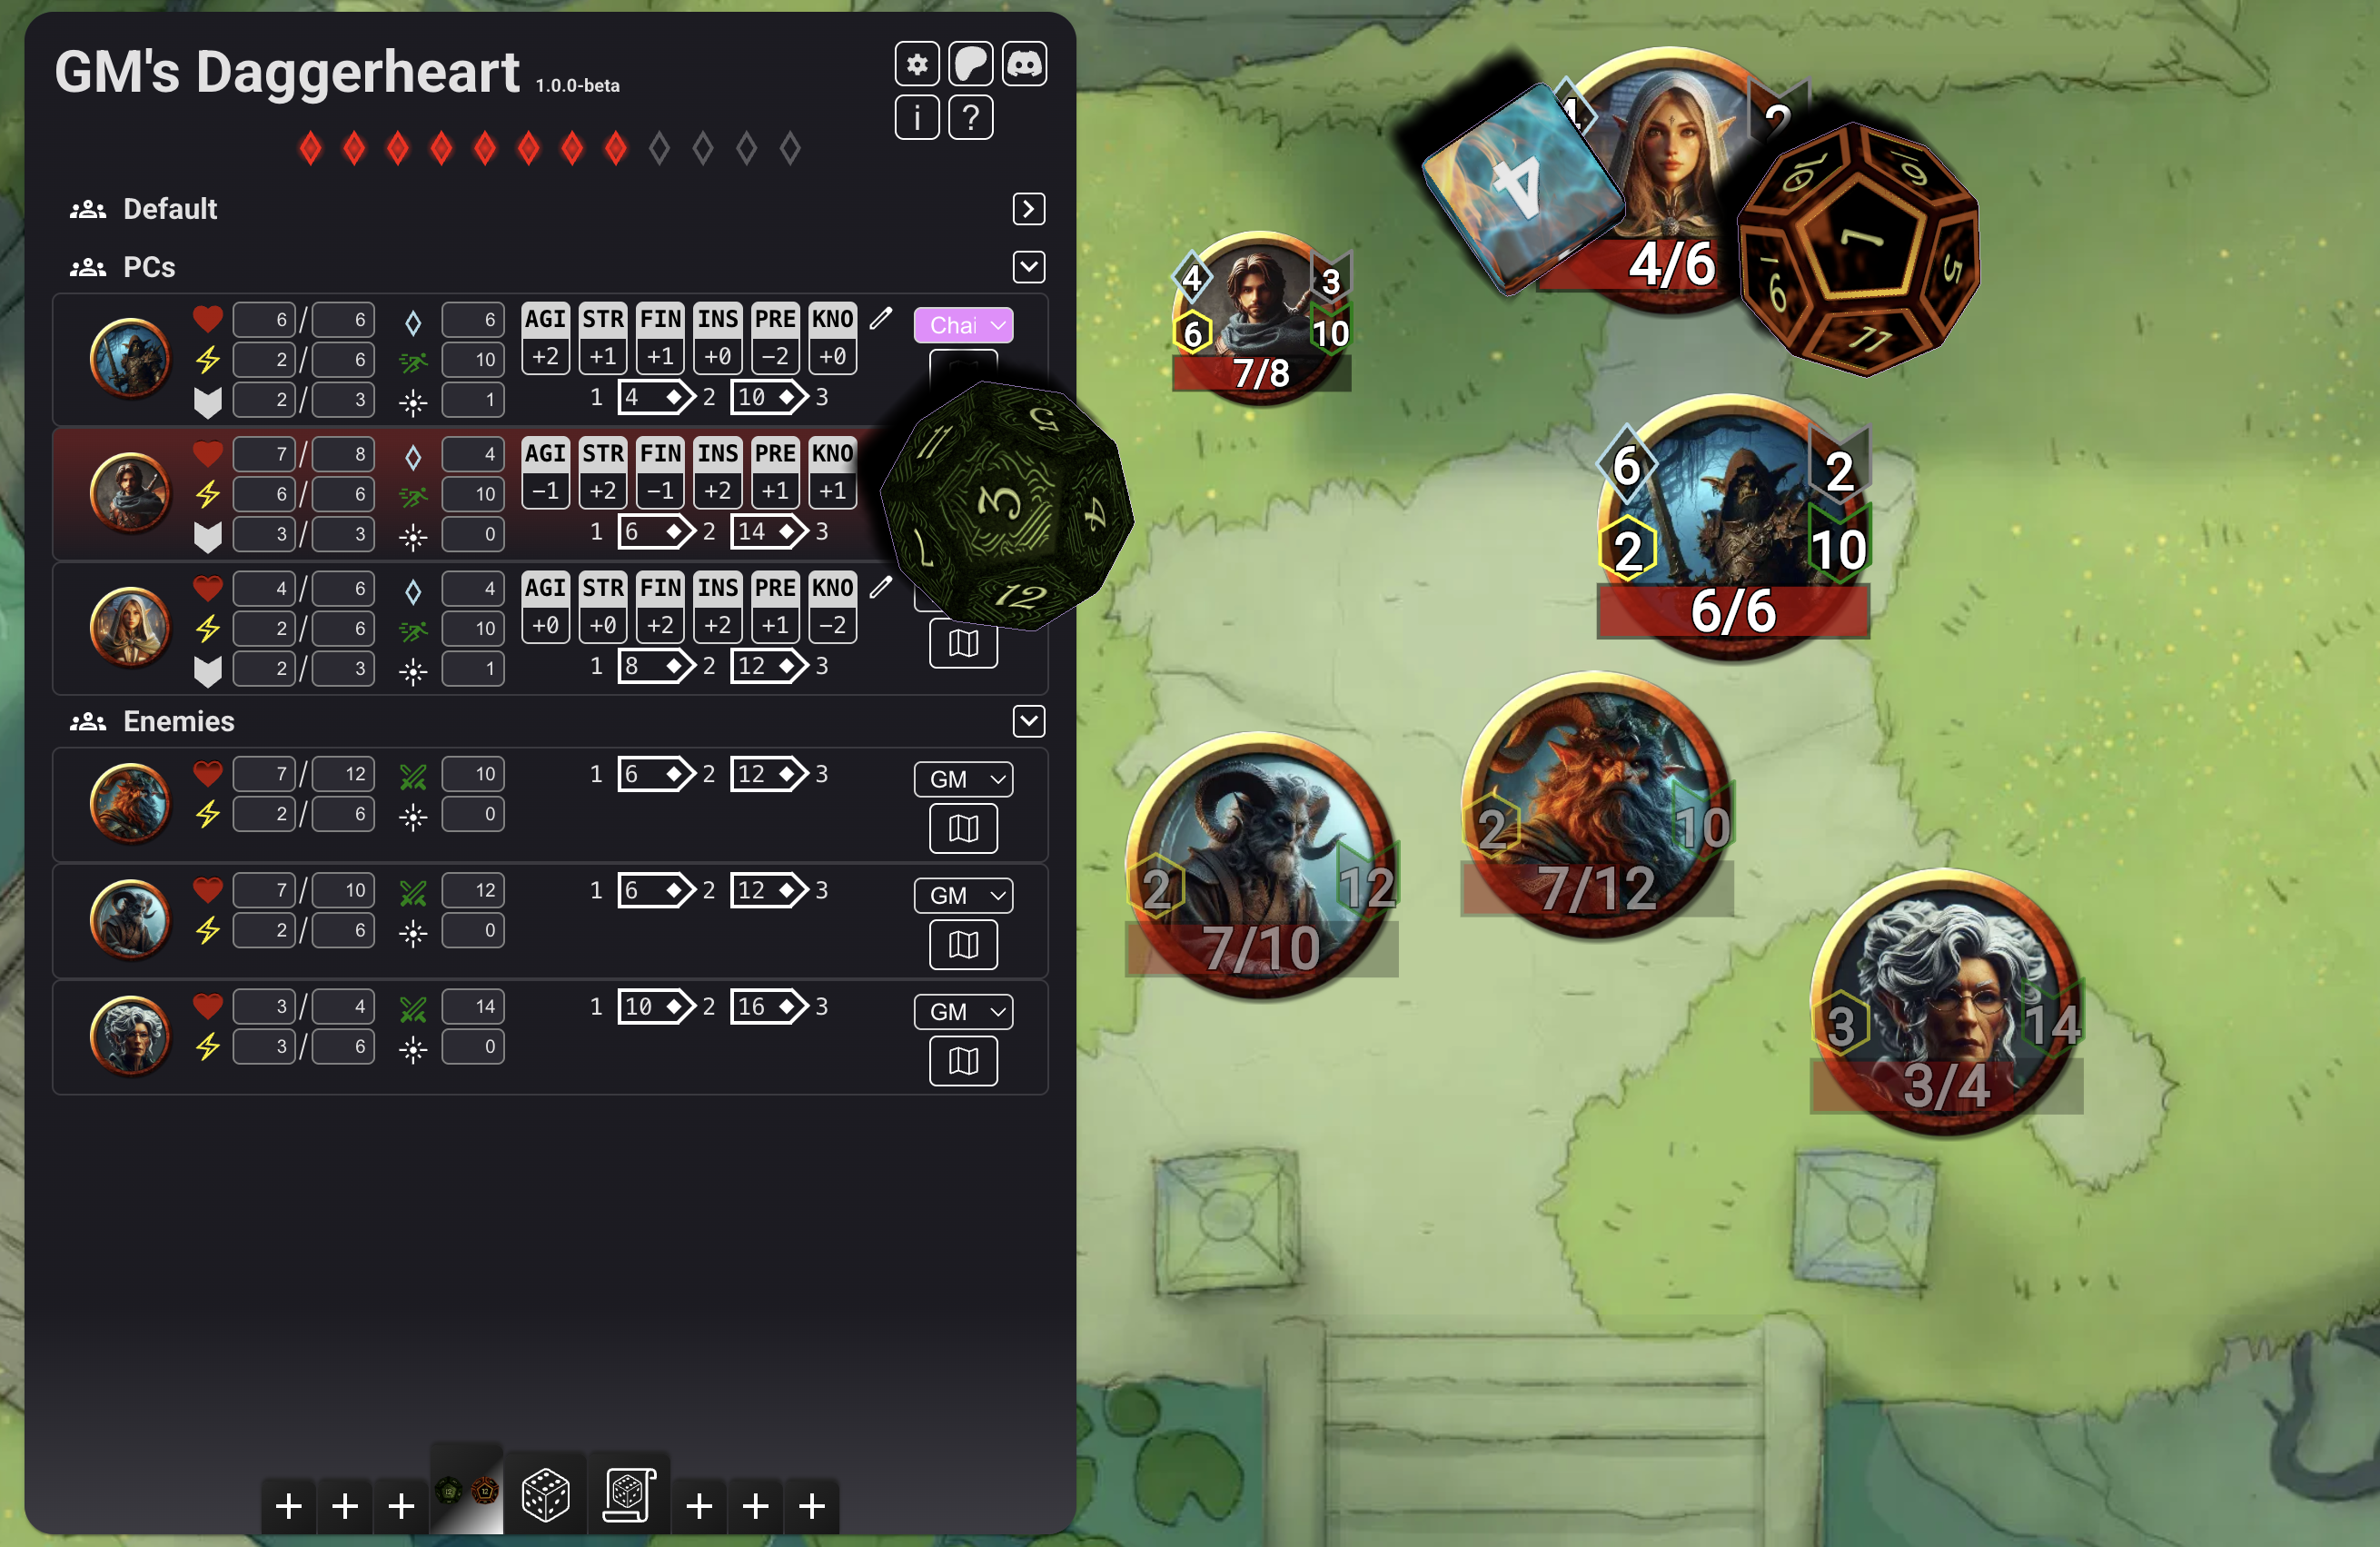
Designed for Daggerheart this extension allows tracking and changing Players and Creatures' settings and statblocks while dynamically hiding and showing this information to players.
Tutorial
To quickly checkout the most common features of GMD you can watch this Video Tutorial.
How it works
The extension has two main windows:
As weill as the following on-scene information:
- HP
- Hope
- Stress
- Armor
- Evasion/Difficulty
Adding Tokens to the GMD
Tokens that have not yet been added to the GMD have the following icon present when their context menu is open (right click on token):
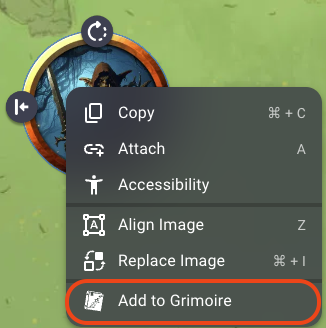
Clicking this icon adds the token to the GMD and assigns it default values. You can now see the Token in the Default Group in the GMD Action Window.
Once the GMD is active you can remove the token from the GMD again by clicking the Remove from Grimoire Icon in the Context Menu.
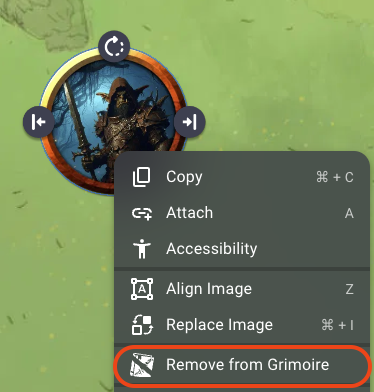
This does not remove the Tokens metadata so in case you want to reactivate the GMD all previous information is still stored with the token.
Once a Token is deleted from a scene all the attached metadata is also removed so this cannot be undone.
In case you have a creature token multiple times within the same scene, it's easiest to setup one token and then copy it as often as you need, because the GMG information will be copied as well. This saves a lot of time when setting up scenes.
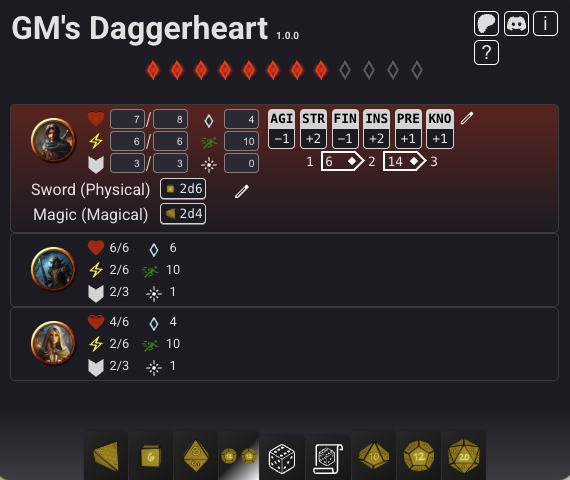
Action Window
At the top of the Action Window the current version of the extension is displayed. Three system links are also present as well as two social links. Also the current Fear tokens of the Game Master are displayed here for Players and GMs.
The system buttons open a new modal:
- The [⛭] buttons opens the Settings.
- The [i] button opens the changelog so you can see recent changes
- The [?] button opens the help menu which displays the same help information you are currently reading
Settings
Settings are grouped into two categories:
- Room Settings - affecting all scenes in the current room
- Scene Settings - affection only the current scene
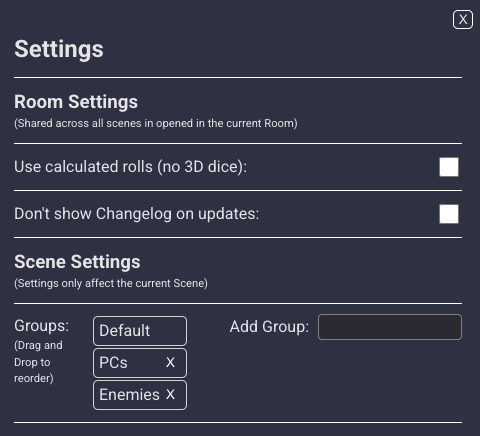
Room Settings
- Use calculated rolls (no 3D dice): By default the dice roller is enabled if you don't want to use dddice for dice rolling you can activate this option and an integrated dice roller will be used. This makes dice rolling faster because the calculation is done locally but you will not see beautiful 3D rendered dice.
- Don't show Changelog on updates: This will disable the automatic popup when a new version of GMG is loaded. If not selected a notification will be shown once the update process has been finished and the changelog icon will flash for 30 seconds to indicate that there are new changes available.
Scene Settings
- Groups: This setting allows you to define different Groups used for ordering Tokens. There is a permanent "Default" group. The groups can be rearranged by dragging and dropping them in the desired order. To add a group use the text input below the group list. Press "Enter" to add a group to the list. Tokens in the GMG remember their group association (if the group is deleted) but are added into the default group until they are moved to a different group. So deleting and re-adding the same group restores the previously associated tokens to that same group.
Token List
The Token List consists of groups and tokens associated with each group. GMG remembers which groups are open or collapsed between sessions. Collapsing a group hides the tokens it contains in the list, but they are still tracked by the GMG and the Popover is still available.
Tokens can be moved between groups or reordered inside a group by dragging and dropping or right clicking their image. By default, this has no effect on the Player Action Window which is sorted by PC Token ownership.
Clicking a token results in the corresponding item in the scene to be selected. To Select multiple tokens hold "SHIFT", "CTRL", or "CMD" and click token names in the list. Just like in other programs, holding "SHIFT" and clicking a Token selects all Tokens between the clicked and the nearest selected Token.
Selecting token names in this way causes the Owlbear Token Contextmenu to open. When selecting multiple tokens names only the context menu for the first selected token is opened, but all items are selected.
Double-clicking a token focuses the scene on the corresponding icon.
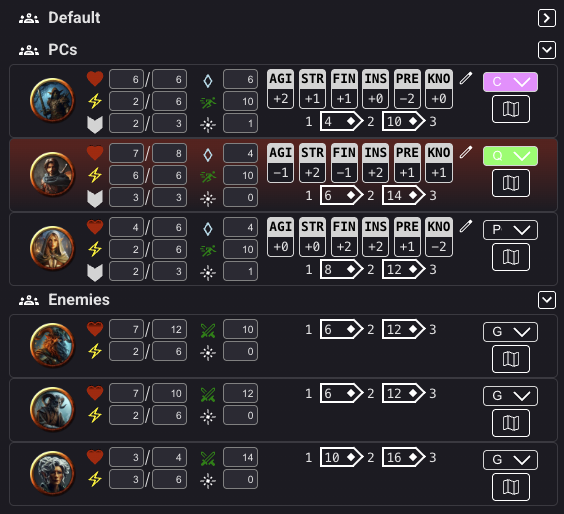
Token
A Token in GMD represents a single Owlbear Item where the GMD Extension has been activated. Tokens are represented differently if they are a PC Token or an NPC/Adversary. It consists of the following parts:
- Token Image as it appears in the Scene
- A section with Health, Stress and Armor (PCs only)
- A section with Hope (PCs only), Evasion/Difficulty and Spotlight
- A section with clickable stats that trigger dice rolls and the damage thresholds
- A section where the ownership of the token can be assigned and a button that lets you put those stats directly on the map.
For all Icons with evasion/difficulty being the exception the values can simply be changed by clicking them. Clicking them with the left mouse button increases the value by 1, clicking them with the right mouse button will decrease the value by 1.
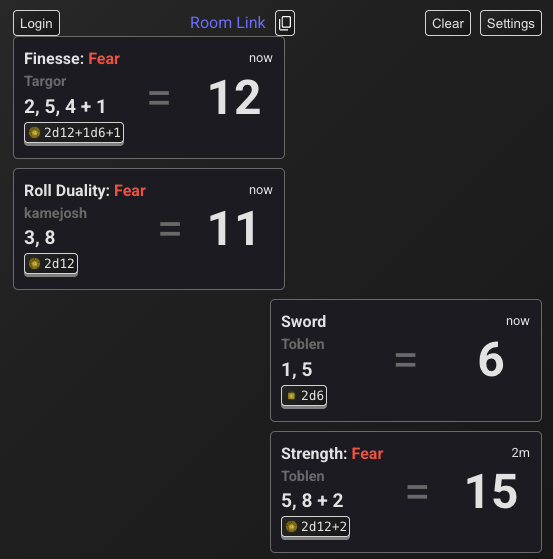
The Stats show a popup to roll with ADV or DIS or hidden. When rolling a stat, the result is automatically determined to be rolled with Hope or Fear and Hoe and Fear are updated for Player and GM. When clicking the Edit Icon next to the stats you can adjust the values.
If the current stress value has reached the max stress value The Token gets a red background indicating that the Character is "vulnerable". When clicking the stress Icon to increase stress it will reduce health instead.
The Damage Thresholds allow to click the 1, 2 or 3 to dirrectly reduce the HP value by this value.
When selecting a OBR Player as owner the will get access to the stats in the Player Action window and will be able to modify those values. Other players will see the stats as well but will not be able to edit them.
When clicking the Map button all relevant information is displayed directly in the scene. PC values will be visible for everyone, NPC/Adversary values will only be visible by the GM.
Player Action Window
The player Action Window has a few differences compared to the GM version.
The only Tokens visible are the PC tokens which are ordered by ownership. So Players will see their own Token first and the Tokens of their companions beneath.
Players can add quick weapon rolls to their own Token to have the rolls available at anytime with the proper labeling for the roll log.
Players can adjust their own stats but will only be able to see the stats of their companions.
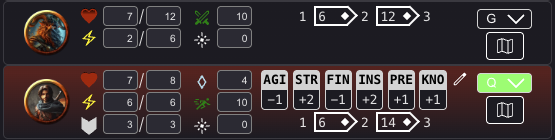
Popover

The Popover is Available for GMs and Players that own a token. It allows to quickly adjust values. The 3d dice roller is not available in the popover context (to much setup overhead would make the popover load really slowly).
Dice Roller
GMD comes with an integrated dice-roller. It can be disabled (removed) by changing the Disable Dice Roller Setting;
Getting Started
By default GMD uses the same account and room that dddice uses. So if you were already using dddice everything is setup. If you were not using the dddice extension you will be given a guest account and start a new dddice room. You should be able to start rolling dice after a few seconds where everything is setup.
If you are using a guest account, the username that will appear under your rolls will be your owlbear username (or owlbear guest name). If you are logged in with you dddice account your dddice username will be used.
dddice login
The login process is the same with the official dddice extension (as this integration was done with their help). When you open the roll log (scroll button on the bottom of the Action Window) you will se a Login Button on the top left of the Roll Log. When you click this Button an overlay appears. Just click the purple link and you are done. It might take a few seconds to register the login. If the overlay doesn't disappear after 5 seconds you were already authenticated, if that is not the case please let me know.
Dice Settings
When the Roll Log is open there is a settings button on the top right side of the roll log.
There are currently fve settings:
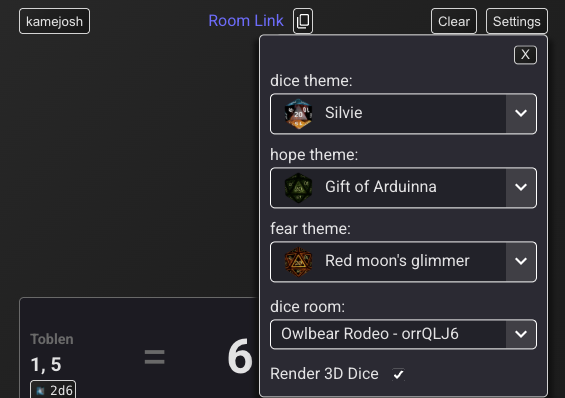
Dice Theme
Each Owlbear user can choose their own dice theme (and the other users will see them roll with this theme). When logged in the dropdown menu list all compatible dice themes (theme has d4, d6, d8, d10, d12 and d20 with matching labeling) will be shown. Users can switch between those themes. Guest users only have access to the default dddice theme (bees).
Hope Theme
The same rules as for the Dice Theme applies. Duality Rolls will use this dice theme for the hope die.
Fear Theme
The same rules as for the Dice Theme applies. Duality Rolls will use this dice theme for the fear die.
dddice Room
You can change the dddice room you want to use directly in this settings menu. Just select the room you want and every player will automatically join this room as well.
3D Rendering
You can choose to use the 3D rendering of dddice, this is the default option. This is a setting for each player. If someone uses a device that can't handle 3d dice rolls they can disable the rendering for better performance.
ADV and DIS are only available on d20s HIDE is available on all dice and CRIT is only available on Damage Dice.
When rolling Dice Buttons in statblocks the dice context is set as meaningful as possible. This means attack rolls usually contain the attack name and "To Hit", and Damage rolls usually contain the attack name and "Damage". This is not always possible but should be close enough.
Initiative Buttons
Initiative Buttons can be used to roll for an individual entry or for the whole group. When rolling for the whole group a roll is triggered for each token in the group and will show up as individual roll in the roll log.
Duality Dice Button
Next to the quick dice button there is a duality dice button that let's you roll the duality dice but won't assign Fear or Hope to Player or GM. So it can be used for e.g. Reaction rolls.
Custom Roll Buttons
At the Bottom of GMD there are 6 freely assignable buttons where you can create your custom presets. You can see the documentation for custom dice rolls here. To get started click on a button with the "+" sign. A text input is opened where you can add your roll preset, if the preset is not valid the text input will be red. The dice roll will not be saved until a valid string has been found. To save the custom string press Enter or the "√"-button.
Custom Roll Buttons are automatically assigned with dddice Dice Box presets where one dice is assigned to a free custom dice button. All already prepared or once deleted custom dice buttons get no value assigned.
You can also choose a different theme than the main theme for your custom dice button by selecting the theme from the theme selector, this also includes themes not selectable as default theme.
Once the preset has been saved the button will show up to 4 parts of the dice equations to make it easier to identify which button does what. It will also display the full dice command when hovering over the button.
To remove a preset hover over the button and press the now visible x-button in the top left corner. This delete button is off to the side and really small by design to make accidentally pressing it on mobile harder.
Custom Dice Buttons are saved to your browsers localstorage. This means they will not be available on other devices or other browsers. Or you have to set them up there as well.
Quick Roll Buttons
The Quick Roll Buttons is the button next to the Roll Log toggle button. It will always display all available dice in the selected theme to quickly roll them. It also contains a text input field where you can enter a valid dice string and roll it without saving it.
Simple Dice-Calculator
When in the Settings the option "Use calculated rolls" is activated, dddice is disabled. GMG will then use a local script to calculate the result of the chosen dice-roll and use the OBR broadcast API to notify all connected players of the result.
The simple dice-calculator uses the rpg-dice-roller package under the hood. Available dice notations for custom dice buttons and the quickroll function can be found here.