
Clash!
Battle-System
Clash!
A configurable combat tracker allowing you to be as simple or as complex as you want. Show only names and initiatives, or go as far as to include stat blocks per token and elevation. Features: A configurable list to keep track of: Health, AC, Movement Speed, Initiative, Elevation, and Ongoing Effects. Unit stat blocks keep track of most DND5e attributes and allow for clickable/rollable fields. Locally saved collection to hold all of your custom/saved creatures. 3D or text-based dice rolling with a roll log. Discord logging. .. and more.
Table of Contents
- Getting Started
- Using the Stat Blocks
- Importing Stat Blocks
- Using the Collection/Search
- Using the Effects Column
- Navigating the Settings Page
- Configuring how Dice work
- Player Input
- Updating Values as a Player
- Toggling Auto-Focus for Turn Changes
- Why Players cannot see/use Stat Blocks
- Tips and Tricks
- Quick-Math!
- Auto-Loading Stats for a Token
- Mass Edit a group of tokens at one time
- Assigning Token Owner through Clash!
- Group-Roll Initiative for 'Monsters'
- Support
Getting Started
1. Adding a token to the list
When you first open up a fresh scene, your List will be blank. To get some units on the list, you will need to drag the tokens into the scene and then right-click that token. This will open up the context menu, and from there you can click 'Add to Initiative'.
Note: All information for tokens in-play are saved to the scene in Clash.
From here, you can freely edit any of the values on the list - directly on the list. Just start typing, and Clash will save as you go. If you want a quick-way to roll initiative, just click the dice icon next to the unit's name and it will roll a D20 (Or whatever dice type you specified in settings) for you!
Note: As a helpful shortcut, double-clicking on a unit in the list will focus the camera on wherever that token is.

2. Removing a token from the list
Once a token has been added to the List, the same button on the context menu will be replaced with a "Remove from List".
You can also right-click the unit in the List itself and select 'Remove Unit'.

3. Adding stats to a token
Suppose you want to start adding some information to a token - in the form of a stat block. If the unit has been added to the list, you can click the right-triangle to open up that unit's stat block. You can also right-click a token and select 'View Info' - even if the unit is not on the list. This is a mini-window showing all information for that particular token.
 Unlike the Combat Tracker List, this does not auto-save as you edit information. So be sure to click the Save button when you are done editing (the DISK icon in the top right).

4. Changing Turns and Resetting the List
You can change the current turn by clicking on the 'Next' button. (Or 'Previous' if you goofed up.) If you have not disabled Camera Focus in the settings, your camera should shift to that unit. If you have not disabled the Turn Label in the settings, your turn-message-label should point to that unit. If you are using effects, this will increment it's counter that it uses to check if it's expired or not.
When you are done with combat, or just simply want to start fresh - you can click Settings and 'Reset Initiative List'. This will put all HP back to maximum and reset all initiative's to one.

Using the Stat Blocks
1. Editing Values
You should be able to edit any value in white. For certain values (Like Ability Scores or Saving Throws) you will need to right-click (Or long-press on mobile) to click "Edit Value". That is because these values are 'Rollable Values' that when normally clicked will perform a roll instead!

2. Adding Clickable Dice Values
For the Ability Scores and Saving Throws, simply clicking 'Edit Value' and changing the number is all the updating you'll need. No need for roller syntax here to make them work. For all else...
Roller Buttons/Syntax
If you want to add those types of clickable values to your Actions, you can do so in the format of dice notation.
For damage/checks rolls: (#d#) or (#d# + #) - For example (1d4) or (2d6 + 2). The parenthesis are needed.
For attack rolls: Just PLUS and the number. For example, +10. No parenthesis. This will roll a 1d20+10.
If you click away from the field you are editing, the card should refresh and your roller button will be available.

3. Adding Skills to the block
You can add as many skills as you want to the stat block using the Plus icon next to each header. This will add a new item to each category, with a Name and Description input.
Note: If you added one too many, just delete the text in the name/description inputs and it'll go away after saving.

4. Stat Block Buttons
There are a few buttons at the top of each stat-block to manipulate them.

- The Pin: This will 'pin' the stat block window to the top right of the screen, for easy access in case you need to reference the block often. Only one window can be pinned at a time, and they can't be dragged around (limitation I can't do anything about currently).
- The Favorite Button: This will toggle the 'Favorite' on a stat-block, so that when it is saved to the collection it will be in the Favorites section. (Which in short means it'll always be shown in the Search list, without needing to search for quick reference).
- The Save-To-Collection Button: This will save the current unit's Stat Block to your collection, where you will be able to access it via Search. There are benefits to having an item in your collection, like Auto-Loading and Easy Importing.
- The Export to JSON Button: This will copy a JSON block of the current unit's stat block to your clipboard. From there you can send it to someone else, or paste it into a text editor so that you may freely edit it. You can re-import JSON items via the Import Custom JSON button below.
- The Save Button: This saves your block information. Be sure to save before closing the window, or else your changes will be lost.
- The Close Button: The stat blocks do not close when you click away (To avoid randomly losing data), so use this to close the window.
Importing the Stat Blocks
1. Importing from Battle-System
To access the Battle-System search data, click on 'Search Monster Data' on the bottom left of a stat block.
Clash! uses it's own remote database to access SRD DND5e information. Specifically SRD information, because I do not want to be sued and I will not be adding access to 'pirated' material. Whenever you use Search, it will return results that match the query - along with any information you might have in your Collection that matches the query.
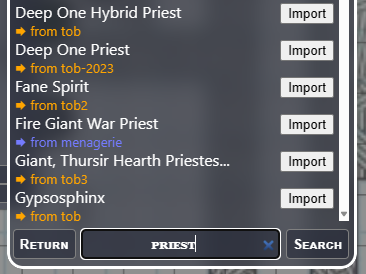 To import, simply click on the 'Import' button. The slugs on the left dictate one book the information comes from.
Note: Clash does not pull over EVERY informational field. Some things are left a bit fuzzy, as it's information one would rarely use while running a game. Or simply the information doesn't exist on the data that is pulled back.
2. Importing Custom JSON
To access the Custom Import screen, click on 'Import Custom JSON' on the bottom right of a stat block.
If you have never used this before, the easiest way to get to grips with it would be to search for a random monster, save it, then click the 'Export to JSON' at the top of a stat block. This will give you an example JSON to play with. From there you can edit it in a text editor, and then paste it into this screen for import.
This is also where you will be pasting the information you get from ChatGPT, if you are using that option.

3. Importing information from ChatGPT
This uses the Import Custom JSON option, but leverages chat GPT. The instructions shown in this image are also shown on the Import Custom JSON screen. clicking the 'Template Prompt' button will give you information to paste into ChatGPT, which can be surprisingly good at getting quick ideas on the table - especially for homebrew.
The information returned should be a JSON block that can be directly pasted into Clash!
 As a quick example, I took the prompt and asked for a "Ninja Dinosaur". This is the result, after being imported.
 Clickable actions and all!
Using the Collection/Search
1. Saving a monster to your Collection
 To save the current block to your collection, click on the Folder with a Down-arrow Icon. This will save whichever the current block is, along with the current stats. If you have something in your collection with the same name when you do this, it will overwrite the previous one.
Note #1: Multiples of the same name CAN exist if they are made by different users (have different authors on the slug)
Note #2: If you have the 'Favorite' button toggled when you do this, the item will also be favorited. Saving again with the 'Favorite' button off will unfavorite the item.
To save the current block to your collection, click on the Folder with a Down-arrow Icon. This will save whichever the current block is, along with the current stats. If you have something in your collection with the same name when you do this, it will overwrite the previous one.
Note #1: Multiples of the same name CAN exist if they are made by different users (have different authors on the slug)
Note #2: If you have the 'Favorite' button toggled when you do this, the item will also be favorited. Saving again with the 'Favorite' button off will unfavorite the item.
2. Loading a monster from your Collection
 To load a creature from your Collection to the currently open stat block, go to 'Search' and type in the name of the block you're looking for. (If it's favorited, it should already be shown right away.) Clicking the Import button will complete the process.
Note: The 'slug' for Collection items will always say '[Collection]' along with the name of the user who created it. So if you import someone else's Collection or creatures, the items should be tagged appropriately.
To load a creature from your Collection to the currently open stat block, go to 'Search' and type in the name of the block you're looking for. (If it's favorited, it should already be shown right away.) Clicking the Import button will complete the process.
Note: The 'slug' for Collection items will always say '[Collection]' along with the name of the user who created it. So if you import someone else's Collection or creatures, the items should be tagged appropriately.
3. Removing a monster from your Collection
To remove a creature from your Collection, just search for it as if you were looking to load it and click on the 'X' button on that list. That will remove the creature.
4. How favorites work in your Collection
When a block has been favorited, it's more of a 'bookmark' so that you don't have to search to find it. Say you have an expansive collection of 1000s of monsters - but for the next few months you're running a space-themed campaign that only uses 10 of them quite constantly. You can 'favorite' those 10 blocks so that when you click the search button, they are front and center and you don't need to do a query to find them.
5. Patreon Subscriber Benefits
If you have subscribed to the Battle-System Patroen - thank you! You can tell if you're membership is active (and authorized) by clicking on the Whats New Icon. You'll see a little crown instead of the Patreon logo in the bottom left.
As a benefit with Clash!, you will be able to store your collection remotely. So the data will not be tied to a single computer and you can access it anywhere. If you have already finished registration (check details on the Patreon page), it should already be ready to go.
If you already have local data that you want transferred to remote storage, go to SETTINGS and click 'Upload'.
 Note: Currently you can only Import/Export every few minutes, just to be safe and avoid people smashing the button for fun.
Using the Effects Column
When the Effect column is on, you can set it to remind you when effects expire during combat.
1 Setting an Effect
When you click on the 'Sparkle Icon' for a unit, the Effects popup will open. On here you can set up to 5 effects for the tracker to follow. The steps are;
- Type the name of the Effect to be tracked.
- Input the amount of rounds this effect will last for.
- Click the toggle to show if this effect ends at the start of their turn (when the turn becomes theirs), or at the end of their turn (when the turn is on the next person).

After that, click 'Save Effects' for it to be active. After an Effect has been saved, you will be unable to edit it when you go back in to the Effects pop-up. It'll have a black outline on the inputs. It can only be 'cleared' at this point, if needed.
2. How Effects Work
A unit with active effects is indicated by the sparkle icon being orange.
 You can click the sparkle to see what effects a unit has ongoing, or mouse-over it to see what they are an when they end.
 When an effect expires (via the turn-order progressing) a pop-up will alert everyone that it is over and the sparkle will remove it's orange hue.

Navigating the Settings Page
1. Backing Up/Loading/Deleting your Collection
 At times you will want to keep a back-up of your data, or perhaps you want to use it on another machine. Maybe share it with a friend? You can do so in the Settings.
The EXPORT button will download your entire collection to a text file on your machine.
The IMPORT button let's you choose a text file on your machine that contains Clash! JSON data
Note: Be sure to select "Unfavorite" if you do not want any of the imported items coming in as Favorites.
The DELETE button will erase your entire Collection, starting you from scratch. Use with care, there is no undo.
At times you will want to keep a back-up of your data, or perhaps you want to use it on another machine. Maybe share it with a friend? You can do so in the Settings.
The EXPORT button will download your entire collection to a text file on your machine.
The IMPORT button let's you choose a text file on your machine that contains Clash! JSON data
Note: Be sure to select "Unfavorite" if you do not want any of the imported items coming in as Favorites.
The DELETE button will erase your entire Collection, starting you from scratch. Use with care, there is no undo.
Note: The Collection part of Clash! is saved locally on your machine. So if you have cookies disabled, localstorage disabled or anything that would stop data from being saved to your machine - it will not work. There should be a warning at the top of Clash! if it detects this.
2. Difference with Reset and Clear List
Resetting the list will put all unit's HP back to maximum, set their Initiative to 1 and put the Turn and Round back to 1. This is useful for testing, or starting a fresh combat with your players if they still exist on the list. Clearing the list will remove all units from it, and also set the turn/round back to 1.
3. Configuring the Combat Tracker Columns
Clash! is working towards a more game agnostic approach, so the columns that are show on the List are fairly customizable. You can have your setup as simple or complex as you like.
 Initiative and Name columns are always shown by default, but you can add..
- Health: Minimum and Maximum inputs. (These support quick math, so if the value was 40 and you typed in -15, it will change to 25.)
- Temporary Health: For the games that use this one, handy to have instead of overlaying it on health.
- Armor: As a quick reference field to see a unit's armor class at a glance.
- Movement: A quick reference to see what a unit's fastest move speed is for moving the token about. You can also mouse-over this field to see all of their movement options.
- Effects: This enables the Effects column, which has a more detailed explanation above. It's used for tracking when effects expire.
- Elevation: This will show an arrow and number on the token, indicating if it's above or below regular elevation. (Ie; ⬆️60)
- Roller: This enables the 'quick roll' column, which are the dice icons you can click to roll initiative.
- Stat Block: This enables the triangle buttons on the right side of a unit, to access their stat block. Changing these columns will also change the columns player's have access to. Having fewer columns will also shrink the window itself, minimizing it's onscreen footprint.
4. Controlling the Player View
Clash! at it's heart is a GM tool, but there are some options to allow player input in order to make a GM's life easier. While the list is active for players, they are able to input values for all of their own units in realtime.
So when you ask everyone to roll Initiative - they can input the numbers themselves, instead of you waiting for each person to tell you. All tokens a player owns will be outlined in their color, and have enabled inputs.
Or they can add their armor class value, so you have a quick reference to know if they have a chance of being hit.
 The options are;
- Disable Player Initiative List: This outright blocks players from using the list at all. It replaces it with an image.
- Hide Enemy Information on Player Initiative List: This will make it so that players are unable to see any of the enemies stats on the list, as the GM can. They will still be able to see their own token's information though.
- Disable HP Colors on Player Initiative List: By default, as an enemy's HP gets lower Clash! will change the color of their name to give the players an visual indication of 'how bad' the enemy is doing. (So they don't keep asking you.) It changes to yellow around 50%, and then red at around 25%. Turning this on will stop that, keeping them guessing.
- Disable HP Bars on Tokens: When enabled, HP bars will no longer be drawn on each token in the Initiative List.

- Show HP Numbers instead of Bar: If you do not like the look of the bars and want to give the players hard numbers to look at, this option will show them exactly what the enemies HP is.
- Reverse Initiative Order: Some systems use a Reverse Initiative. This is for them.
- Show Names on Token: By enabling this, Clash! will write the name it has saved on to the token. (By default, no names are written on tokens at all.) Note: Clash! caches the name of a token when it's been added to the list for the first time. This is to allow for players who like to write conditions/effects on a token during play, without compromising the name on the list.
- Descriptor Names for Duplicates: For people who LOVE FUN, when a duplicate name is detected in the list it will be renamed from a list of adjectives in Clash. So instead of 'Goblin 1, Goblin 2, etc' you'll get 'Goblin, Mighty Goblin, Daring Goblin, etc'.

- Disable Turn Label: This will remove the small message label that appears on a token when it is their turn.

- Add Dex to Intiative Rolls: This will add whatever the unit's DEX modifier is to their Initiative Rolls. Clash! only supports adding DEX to rolls at this point, as Feat support would .. be a pain.
- Initiative Dice: Some systems do not use a D20 system for Initiative. Changing this number will allow you to set whatever dice it is that your system uses.
Configuring how Dice work
1. Rumble! Integration
If you have the Rumble! extension in your room, you can have it so Clash! log it's dice rolls through Rumble for your party to see. They will be displayed in the chat log there.

2. Bones! Integration
If you have the Bones! extension in your room, you can have it so all of your rolls are done through their instead. Similar to the Rumble! extension, your players will be able to view the rolls still. Just displayed as Bones! does, with a notification popup in the bottom left (for you and your party to see) and the 3d dice overlay.

3. Self-View-Only Clash 3D Rolls
If you just want to see the visual dice for yourself without enabling any other extensions, you can turn on the Clash! 3D dice and it will display a window of your rolls on the bottom right.

4. Text Result Rolls
If you're someone who wants speed, you can forgo all of the 3d dice rolling and opt for the text results. This will just show an OBR notification pop-up at the top of the screen with your dice results. You can use the setting directly below this one to also have it shown to the entire party.
5. Discord Logging
If you're using Discord and would like a log of all your rolls exported directly to a channel on your server, you can add your webhook URL here and Clash will drop text results of all rolls it does to your channel. Note: If you are having your rolls done through Bones!, this will not work as the actual roll is being done in that extension. Not Clash.
Player Input
1. Updating Values as a Player
As a player, your view is a little different from the GM. (Possibly a lot more, depending on the settings the GM has enabled.)
If allowed, you are able to toggle the values for tokens that you own and they'll be updated in realtime for everyone to see.
The exception here is Movement Speeds, as this is data that is set via the Stat Block.
2. Toggling Auto-Focus for Turn Changes
From the player view, if you want to have the screen shift to the token when the turn changes, click the toggle and your camera will focus as needed.

3. Why Players cannot see/use Stat Blocks
You may have noticed at this point that player's are unable to access the Stat Block part of Clash!. This is on purpose, as I see Clash as a GM tool - not a everything-and-a-kitchen-sink tool. Player sheets tend to be a lot more complicated than the amount of information that I'd want to fit into a stat block, not to mention the upkeep on them would be miserably tedious. Tokens are also saved to the -scene-, so you would need to drag that information around between every scene that you went to. In short, it might work for a handful of people but it would be a nightmare for others. I decided to go the approach of leaving Clash to focus on what it is, and I have another extension I'm working on called Chronicle! that will be handling the player sheet side of things. It's not in the OBR store as of yet, as I'm still tinkering with remote storage and the like. Though if you're curious, you can visit the OBR Discord for a link.
Tips and Tricks
1. Quick-Math!
So you don't want to do math. I get it. For HP values, you can type in the adjustments and Clash will do the rest. So if they have '100' hp, you type in '-25' and it'll update itself to '75' when you unfocus the element or hit enter.

2. Auto-Loading Stats for a Token
Once a goblin, always a goblin. Using the collection and some standard naming, you can make your tokens automatically have the correct stat block.
First: You want to make sure your tokens have the correct names by default. (So if you dragged an image in, and it's name is still "ImageXYZ.png" - you want to make sure it's changed to 'Fighter' - or whatever you're using).
Second: You want to make a stat block for 'Fighter' (making certain the name matches the token name) and save that to your collection.
That's it! Now when you drag in a 'Fighter' token, it should automatically have the stats you're looking for.

3. Mass-Edit a group of tokens at one time
If you select a group of tokens at once, you can update them in one swoop by right-clicking one to go to the context menu and selecting 'View Info' (You may notice the icon looks a little different).
This will bring up a modified version of the stat block that will save the stats to all tokens at once.

4. - Assigning Token Owner through Clash
Normally in Owlbear Rodeo, you would need to turn on Player Permissions in order to set the ownership of a specific token. Using Clash, you can do this even faster via the List. Whenever you right-click a token in the combat tracker, you'll see a list of players currently in the room. Select any one of their names to assign the token to them.

5. Group-Roll Initiative for 'Monsters
If you click the name of a monster in the List, it'll turn purple. What this signifies is that particular unit is a 'monster', and when you click on the group roller button (the purple dice up top) it will roll initiative for them all at once.

Support
If you have questions, please join the Owlbear Rodeo Discord.
Or you can reach out to me at [email protected]. You can also support these projects at the Battle-System Patreon.